Hello, World!
example. This time I'm going for a simple echoing TCP server.Since I'm quite new to Rust, I followed this nice tutorial on how to build a REST API in Rust. It is based on Actix Web and it offers an intuitive way of constructing a REST API.
After finishing the tutorial and some local testing to demonstrate it 'worked on my machine' (you can probably guess now what comes next),
I tried to compile it to the wasm32-wasi
target:
rwwilden@LAPTOP-FMQ1F4IR:~/projects/rust_wasm_webserver$ cargo build --target wasm32-wasi --release
Downloaded wasm-bindgen-shared v0.2.83
...
Downloaded 8 crates (420.5 KB) in 0.55s
Compiling autocfg v1.1.0
Compiling cfg-if v1.0.0
...
Compiling socket2 v0.4.7
error[E0583]: file not found for module `sys`
--> /home/rwwilden/.cargo/registry/src/github.com-1ecc6299db9ec823/socket2-0.4.7/src/lib.rs:124:1
|
124 | mod sys;
| ^^^^^^^^
|
= help: to create the module `sys`, create file "/home/rwwilden/.cargo/registry/src/github.com-1ecc6299db9ec823/socket2-0.4.7/src/sys.rs" or "/home/rwwilden/.cargo/registry/src/github.com-1ecc6299db9ec823/socket2-0.4.7/src/sys/mod.rs"
error: Socket2 doesn't support the compile target
--> /home/rwwilden/.cargo/registry/src/github.com-1ecc6299db9ec823/socket2-0.4.7/src/lib.rs:127:1
|
127 | compile_error!("Socket2 doesn't support the compile target");
| ^^^^^^^^^^^^^^^^^^^^^^^^^^^^^^^^^^^^^^^^^^^^^^^^^^^^^^^^^^^^
As you can see, this fails miserably. After a bit of Googling, it turns out that the socket2
crate fails to compile
because the sys
module is only imported for a unix
or windows
target. Because of my still limited knowledge of Rust
I'm not 100% sure what that means but anything that depends on socket2
won't compile to WASM. These
two GitHub issues provide further details.
So we need another way to open a socket via WASI in WASM.
wasmedge_wasi_socket
to the rescueThe creators of WasmEdge also built a crate called wasmedge_wasi_socket
that allows binding to a socket.
I'm not sure how that works though. WASI sockets is still in the
WASI Feature Proposal state so
by no means standardized. But let's give it a try 🙂
There's a nice tutorial for implementing a
simple TCP server that echoes back the request you send it. I just followed along, the source code can be found
here. Note that wasmedge_wasi_socket
exposes
the same types as std::net
.
Compiling it to the wasm32-wasi
target and a subsequent AOT compile work fine now:
cargo build --target wasm32-wasi --release
wasmedgec target/wasm32-wasi/release/rust_wasm_webserver.wasm rust_wasm_webserver.cwasm
Let's define the Dockerfile:
FROM scratch
ENV PORT=8000
ENV RUST_BACKTRACE=full
ENTRYPOINT [ "/rust_wasm_webserver.cwasm" ]
COPY rust_wasm_webserver.cwasm /rust_wasm_webserver.cwasm
and build an image:
docker build -t rust-wasm-webserver .
We should now be able to run the image:
docker run --name rust-wasm-webserver \
--runtime=io.containerd.wasmedge.v1 \
--platform=wasi/wasm32 \
--publish 8000:8000 \
rust-wasm-webserver
Unfortunately, we get an error message:
Error: Os { code: 6, kind: WouldBlock, message: "Resource temporarily unavailable" }
The reason for this is my attempt to set the non-blocking flag to true
when accepting connections.
The reason for this is my (until now) limited understanding of non-blocking sockets.
This is explained in more detail here and
here.
A non-blocking accept returns immediately with an error EAGAIN
or EWOULDBLOCK
in case there is no client
connecting at that time. You actually see a kind: WouldBlock
in the error message. You typically handle that
by checking for these errors and trying again a little bit later, which is a little bit out-of-scope for
this blog post.
When we run the WASM application with the fix, we get the expected output:
Going to bind to port 8000
Bound to port 8000
Accepted client
Accepted client
Accepted client
Requests can be sent via curl:
C:\Users\rwwil>curl -d "Server-side WASM" -X POST http://127.0.0.1:8000
echo: Server-side WASM
Tanzu Application Service (or TAS) is the VMware commercial implementation of the open source Cloud Foundry project. A customer of ours is running TAS to enable development teams to focus on building software instead of having to handle a lot of Ops-related tasks. I'm learning how to use Rust and decided to try and deploy a compiled Rust binary onto TAS.
The application itself is a simple REST API, built using Actix Web. I followed this blog post to create a very simple ticket API. The only real change I made was to dynamically assign a port number from the environment:
let port = env::var("PORT").unwrap_or(String::from("8000")).parse::<u16>().unwrap();
println!("Running on port {port}");
HttpServer::new(move || {
App::new()
.app_data(app_state.clone())
.service(post_ticket)
.service(get_tickets)
.service(get_ticket)
.service(update_ticket)
.service(delete_ticket)
})
.bind(("0.0.0.0", port))?
.run()
.await
A simple cargo build
produces a binary in the target/debug
folder, which in my case is called actix_demo
.
So let's see what happens when we push that to TAS:
cf push actix_demo -c './actix_demo' -b binary_buildpack
By the way, the reason I'm using a binary buildpack here is because TAS by default doesn't have a Rust buildpack although these do exist.
The result of this first attempt is an error message in the logs:
ERR ./actix_demo: /lib/x86_64-linux-gnu/libc.so.6: version `GLIBC_2.28' not found (required by ./actix_demo)
When you compile Rust, by default it will dynamically link the platform's standard C runtime (CRT). So that
library won't be included in the Rust executable but is expected to be provided by the host OS. However, you can
tell the Rust compiler to statically link the CRT for a specific target by specifying a target feature.
When using cargo
, you do this by defining a .cargo/config.toml
file with the following contents:
[build]
rustflags = ["-C", "target-feature=+crt-static"]
target = "x86_64-unknown-linux-gnu"
The crt-static
flag informs the Rust compiler to statically link the CRT, in this case for the
x86_64-unknown-linux-gnu
target.
We now get a binary in the folder target/x86_64-unknown-linux-gnu/debug
and when we push that, we have a successful
deployment of a standalone Rust binary onto TAS.
First of all you need to install the Docker Desktop Tech Preview, download links can be found here. Please note that this is still in beta so all the caveats apply :)
Next step is to get all the tooling in place to compile Rust to WASM:
Download WasmEdge runtime:
curl -sSf https://raw.githubusercontent.com/WasmEdge/WasmEdge/master/utils/install.sh | bash
Note that there are more runtimes to choose from, like SSVM, Wasmer and Wasmtime. I have done no research yet on the pros and cons of any of these.
To make the WasmEdge binaries available on the path and set some additional env variables, run source $HOME/.wasmedge/env
.
Add the wasm32-wasi compilation target to Rust:
rustup target add wasm32-wasi
WASI is the WebAssembly System Interface. It provides access to operating system features like the file system and sockets.
For now, I'm just gonna do a hello world, just to see if stuff works. Next step would be a tiny web server. So we do:
cargo new rust_wasm_hello_world
This results in a small Rust program that just prints Hello, world!
:
fn main() {
println!("Hello, world!");
}
Next I'm gonna compile that to the wasm32-wasi target:
cargo build --target wasm32-wasi --release
which results in a target/wasm32-wasi/release
folder that contains our rust_wasm_hello_world.wasm
.
The wasm file we have now is a WebAssembly bytecode file, targeted to WASI. If you convert it to WebAssembly text format using wasm2wat
, you'll see a large .wat file that has the 'hello world' program plus a lot of WASI code.
This wasm file can be compiled to native code using the wasmedgec
AOT (Ahead-Of-Time) compiler:
wasmedgec target/wasm32-wasi/release/rust_wasm_hello_world.wasm rust_wasm_hello_world.cwasm
And now we have a rust_wasm_hello_world.cwasm
executable that will run on a WASM runtime. This is where the Docker Desktop preview comes in.
Let's first define our Dockerfile:
FROM scratch
ENTRYPOINT [ "/rust_wasm_hello_world.cwasm" ]
COPY rust_wasm_hello_world.cwasm /rust_wasm_hello_world.cwasm
and build an image:
docker build -t rust-wasm-hello-world .
We can run the image directly using docker now:
docker run --name=rust-wasm-hello-world \
--runtime=io.containerd.wasmedge.v1 \
--platform=wasi/wasm32 \
rust-wasm-hello-world
And finally check whether it ran successfully (since this container will exit once it printed Hello, world!
):
docker logs rust-wasm-hello-world
I think this was the most basic stuff I could build with server-side WASM on Docker Desktop. A next step would be to actually run a WASM web server inside a container.
Another next step I'm curious about is whether I can simply replace wasmedgec with any other WASM AOT compiler. I guess in theory this should work as well, using wasmtime:
wasmtime compile target/wasm32-wasi/release/rust_wasm_hello_world.wasm
To prepare for the exam I relied solely on the Udemy course by Mumshad Mannambeth. Literally everything that you need to know for the exam is in there. The course is packed with hands-on practice tests. Since the exam is also fully hands-on, this is essential. Without practice, you'll never finish the exam in time.
With kubectl
you can run most of the commands with --dry-run=client -o yaml
. This will not change anything in the Kubernetes
cluster but will produce a yaml file that you can then modify locally before applying.
Some examples:
kubectl run redis --image=redis --dry-run=client -o yaml > pod.yaml
kubectl create deploy busybox --dry-run=client -o yaml --image=busybox > deploy.yaml
kubectl expose deployment my-deployment --name=my-service --target-port=8080 --port=8080 --type=NodePort --dry-run=client -o yaml > service.yaml
will respectively produce a valid pod.yaml
, deploy.yaml
or service.yaml
file that you can then modify to your needs.
This works for deployments, services, config maps, jobs, cronjobs, etc. Notable exceptions are persistent volumes and persistent
volume claims. If you need the yaml for those, copy them from the documentation.
In some cases you have to update a running pod. Problem is, the only things you can update with kubectl edit
for pods are
the image
, activeDeadlineSeconds
and tolerations
. There are two ways around this:
If you use kubectl edit
and try to change any property you're not allowed to change, you'll get an error. But you will
also get a yaml file in your /tmp
folder that actually has the changes you made. You can now run
kubectl replace --force -f /tmp/new-pod.yaml
which will delete the resource (in this case the pod) you're trying to update and apply the new yaml file in its place. Note that
this prevents you from having to do a separate kubectl delete
. This will save you small amounts of time during the exam, you're welcome 😄
You can also get the pod yaml first and then replace the pod:
kubectl get pod my-pod -o yaml > pod.yaml
And then after making your changes, use the kubectl replace
again.
There's a limited set of documentation that you can use during the exam. This information is also in the exam instructions but in case you missed that:
I started my exam 15 minutes before the official time but only really started with the questions 40 minutes(!) later. The exam onboarding experience isn't as nice as it could (should?) be.
A couple of reasons why it took so long:
You have to download and install the PSI Bridge Secure Browser that allows you to access the exam in a secure environment. This takes some time.
The software requires that you shut down all apps that you have running on your laptop. Things like Dropbox, Teams, etc. I happen to be on a Windows laptop and it also required me to shut down a couple of Windows services. Unfortunately, some of these were auto-restarting. It took me quite some time to figure out exactly what services to kill and how to prevent them from restarting. In the end I was left with three services that kept restarting so I had to resort to shutting them down and then do the check for any offending software really quick after that. Far from ideal.
The process of checking the room is very thorough. You have to do a lot of moving around with the webcam to prove there's nothing inside the room that might help you cheat during the exam. Room, ceiling, floor, table, under the table, floor again, nothing is left unchecked.
So take into account that all this might take you some time before you can actually start the exam.
As I said earlier, there's not a lot of value in repeating all the CKAD avice that's already out there on the internet. I hope I added some useful information that helps you pass the exam.
]]>In the previous post we implemented provisioning and deprovisioning of an Azure Storage account. Because this was already quite a long post, we skipped the binding and unbinding part for the post you're reading now.
All source code for this blog post series can be found here.
When we bind an application to an Azure Storage account, we must provide the application with the means to authorize against the account.
There are a few ways to authorize for Azure Storage:
SAS tokens will not work for a service broker because they are valid for a limited amount of time. And since it's not a lot of fun to write a binding implementation for anonymous access we'll skip that as well.
That leaves us with shared keys and Azure AD. Since Azure AD authorization for Azure Storage is in beta, I guess that would be a nice challenge 😊 And of course it is still possible to provide the shared key as well so client applications can choose between Azure AD and shared keys as their means of authorization.
When we bind an Azure Storage account we need to provide the application that we bind to with all the information that is necessary to access the storage account. So what information does a client application need?
First we need the storage account urls. These are urls of the form <account>.blob.core.windows.net
, <account>.queue.core.windows.net
, <account>.table.core.windows.net
and <account>.file.core.windows.net
.
Next is the means to authorize. The client application that we bind to should be able to use the OAuth 2.0 client credentials grant flow so we need a client id, a client secret, a token endpoint and the scopes (permissions) to authorize for. This means that when we bind, we must
The client application needs to receive all the necessary information to be able to start an OAuth 2.0 client credentials flow.
Besides, we also would like to provide the shared keys for the storage account so the client application can choose how to authenticate: via Azure AD or via a shared key.
The service broker needs some additional permissions besides those from the custom role we defined in the previous post. It should now also be able to create Azure AD applications and assign these to an Azure Storage role.
This means we need to assign Microsoft Graph API permissions to the Azure Storage Service Broker AD application:
We assign the Application.ReadWrite.OwnedBy
permission so the service broker should be able to manage AD apps that it is the owner of.
And because we perform the additional action of assigning a service principal to an Azure Storage role, we also need to extend the service broker role definition with one extra permission: Microsoft.Authorization/roleAssignments/write
:
loading...
To put things in context, the screenshot below shows the result of a bind operation against the my-rwwilden
service.
First we bind the rwwilden-client
app to the my-rwwilden
service, which is a service instance created by the rwwilden-broker
service broker. When provisioning this instance we created an Azure Resource Group and an Azure Storage account (check the previous post for more details).
Next we get the environment settings for the rwwilden-client
application and it now has a set of credentials in the VCAP_SERVICES
environment variables. In the first block we have the settings that allow the rwwilden-client
application to get an OAuth2.0 access token that authorizes requests to the Azure Storage API. The second block has the shared keys that provide another way to authorize to Azure Storage. And in the third block we see the API endpoints for accessing all storage services.
Let's see what this looks like in Azure. Remember, we created an Azure AD app and service principal specifically for the current binding. The service principal is assigned to two roles: Storage Blob Data Contributor (Preview)
and Storage Queue Data Contributor (Preview)
. Let's see whether the principal that was created is assigned to these two roles:
At the top in box 1 you see that we are looking at a storage account named 65cef50071f949f0819c5308
, the same account name we see appearing in the storage urls (e.g.: https://65cef50071f949f0819c5308.blob.core.windows.net
). At the bottom in box 2 you can see that a service principal named fdc45ce4-5f16-43d6-ae4d-ee108428289f
is assigned to the two roles. The service principal name happens to be the name of the binding that was provided to the service broker when binding the service.
For the current version of the broker, I added all code directly to the BindAsync
method of the ServiceBindingBlocking
class, creating a rather large method that does everything. In the next version of the broker I will switch to an asynchronous implementation and take the opportunity to clean things up.
But for now, we'll just take a look at what's happening inside the BindAsync
method. First, we retrieve all storage accounts from the Azure subscription that have a tag that matches the service instance id:
loading...
This is also a fine opportunity to check if the bind request is correct by verifying that there actually exists a storage account with the service instance id tag.
Next we create the Azure AD application that corresponds to this binding. Note that we give it a display name and identifier URI that matches the binding id (lines 5/6):
loading...
Next step is to create the service principal that corresponds to the AD application:
loading...
And assign this principal to two predefined Azure storage roles with predefined ids:
loading...
Because we want to give our client application some options to choose from when accessing the storage account, we also get the access keys to return in the credentials object:
loading...
We finally have all the necessary information to build our credentials object that will be added to the VCAP_SERVICES
environment variable of the client application that we bind to:
loading...
The last two posts had less to do with service brokers and more with Azure. However, you only run into real issues with implementing service brokers when you provision and bind real services. One issue I already anticipated is that provisioning and binding services may take time. So instead of doing this in a blocking way, we may want to leverage the asynchronous support that the OSBAPI offers.
Another thing that's important is doing everything you can to keep your service broker stateless. This essentially means that you must encode the information that Cloud Foundry provides inside your backend system. For example, when binding we receive a binding id from PCF. We use this binding id as the name for an Azure AD application. When we unbind, we get the same binding id from PCF so we can locate the Azure AD app and delete it. This may not be possible in every backend system which means we have to keep track somewhere how Cloud Foundry identifiers (service instance and binding ids) map to backend concepts.
In the next post we will implement asynchronous service provisioning and polling to better handle long-running operations.
]]>In the previous posts we implemented a service catalog, service (de)provisioning and service (un)binding. Both provisioning and binding were blocking operations that happened in-memory. In this post we will give some body to the implemetation by provisioning an actual backend service: an Azure Storage account.
All source code for this post can be found here.
If you don't know anything about Azure or Azure Storage, here's a (very) short conceptual introduction to help explain the remainder of the post.
The service broker we are developing will use the OAuth 2.0 client credentials grant flow to obtain a token that authorizes the bearer to perform the necessary Azure operations. A custom role will be defined that gives the service broker exactly the set of permissions required.
Inside Cloud Foundry we have the concept of orgs and spaces as security boundaries. Azure Subscriptions and Resource Groups are at the same abstraction level. However, creating a new subscription from my service broker and linking credit card details may become a little complex for now so we take the following approach:
<org guid>_<space_guid>
(for example: 109718b6-e892-41e7-8993-09ace9544385_7e5f5bc3-1da9-4f14-8827-d88c09affe02
). If the resource group already exists we do nothing.Following the principal of least privilege we want to give our service broker the minimum set of permissions required to perform the task at hand. So it should be able to create, list and delete resource groups and create, list and delete storage accounts. Besides, the service broker should be able to read storage connection strings during bind operations.
This leads us to the following role definition:
loading...
With this role definition we can create the role in our Azure subscription using the Azure CLI:
az login
az configure --defaults location=westeurope
az account set --subscription 4c70a177-b978-43f9-9fc0-1e50dd20271f
az role definition create --role-definition service-broker-role.json
A short inspection in the Azure portal tells us that our role has been created:
If you wonder where the action names (e.g.: Microsoft.Storage/storageAccounts/read
) come from, you can find the complete list here.
Next step is to create an Azure AD application and service principal that enables our service broker to get an access token that allows it to perform the required operations. The service principal will be assigned to the role we just defined.
I chose to create the AAD application from the Azure portal and the result is an application named Azure Storage Service Broker with client id b2213c77-9d93-474b-9b7f-89a1f0040162
:
Next we generate a client secret that, together with the client id, allows the service broker to authenticate for this AD application using the standard OAuth 2.0 client credentials grant flow.
Finally we assign the service principal that corresponds to the Azure AD application to the role we created earlier:
az ad sp list --display-name 'Azure Storage Service Broker' | jq '.[0].objectId'
az role assignment create \
--assignee-object-id 5afa5a58-fa38-4122-a114-34b989ed88b4 \
--role 'Azure Storage Service Broker'
First we list all service principals with the name Azure Storage Service Broker and get the object id of the first result. Next we assign the Azure Storage Service Broker role to this principal.
We have now done all the preparatory work on the Azure side, back to our service broker application.
The first thing we need to worry about is getting the proper authorization for performing all desired operations. For this we use the Microsoft Authentication Library for .NET (MSAL). MSAL lets us acquire tokens from Azure AD using the OAuth 2.0 client credentials flow via the ConfidentialClientApplication class:
loading...
We need a number of settings, most of which are defined in the Azure AD app we created earlier. Here's an overview of them (from a Cloud Foundry user-provided service which we will use later):
The following settings are necessary to be able to get an authorization token (via client credentials flow) from Azure AD that grants the bearer the permissions we defined earlier in our custom role:
client_id
: the id of the Azure AD application (OAuth 2.0 Client Identifier)client_secret
: a secret shared between Azure AD and our service broker (OAuth 2.0 Client Password)https://login.microsoftonline.com/e402c5fb-58e9-48c3-b567-741c4cef0b96/oauth2/v2.0/token
(Oauth 2.0 Token Endpoint)redirect_uri
: is a relevant part of the OAuth 2.0 spec but not for the client credentials flow so we can enter any valid URI we like here (null
is not accepted)Every Azure operation has a corresponding REST API call. For the purpose of our service broker I wrote a small Azure REST API client library containing the operations we need. I made use of IHttpClientFactory to create typed HTTP clients, as described here.
The library has one entry point AddAzureServices
for adding all client middleware dependencies:
loading...
One example dependency that is added to the service collection is a typed http client for accessing Azure Storage:
loading...
We add a typed http client that implements the interface IAzureStorageClient
and set the base address for accessing the Azure REST API. Besides, we add a [DelegatingHandler
][22] implementation that fetches an authorization token and sets it on every request.
With all the plumbing out of the way we can finally implement a service broker that provisions Azure Storage accounts. Let's take the provisioning step as an example. All code samples below are from the ServiceInstanceBlocking.ProvisionAsync
method (see the first blog post for details on this method).
loading...
The first step is to determine the name of the resource group, a combination of org and space GUID. Next, we create the resource group if it does not exists:
loading...
Note that we apply some tags to the resource group to be able to link it back to our Cloud Foundry environment. The final step is to create the Azure Storage account itself. A lot of the properties are hard-coded for now: location is always westeurope
, the SKU is Standard_LRS
, etc. In a later blog post we will see how to parameterize these properties.
loading...
Again we provide some tags that we use to link Azure resources to CF service instances.
The new service broker needs a bit of configuration to be able to authorize and perform operations. There are a number of ways to provide this configuration:
appsettings.<env>.json
but now we have to push stuff to source control that probably varies per environmentcf set-env
as we did with the basic authentication password in the first post but the number of settings has grown so this becomes a bit cumbersomeI opted for the latter approach by defining two user-provided service instances, one for settings concerning authorization and one for settings concerning the Azure subscription we target. The screenshot below shows how to create the user-provided service instance for the authorization settings by providing a JSON object with these settings.
Next we bind the user-provided service to our rwwilden-broker
app:
After binding the service we show the environment for the app. You can see that the credentials are available in the VCAP_SERVICES
environment variable.
As you can see from the last screenshot, we have one VCAP_SERVICES
environment variable with our settings buried deep within. We could use some help parsing this. Lucky for us, a library exists that can help us do just that: Steeltoe. Part of the Steeltoe set of libraries is Steeltoe.Extensions.Configuration.CloudFoundryCore
that helps provide settings from VCAP_SERVICES
in a more readable format via the CloudFoundryServicesOptions
class.
This is in many ways still a dictionary of properties so we need to perform some translation to get to the AzureRMAuthOptions
class that the small Azure library we wrote expects. You can check out the Startup
class to see how that works.
We now have a new version of the service broker running inside Pivotal Cloud Foundry that actually provisions a backend resource: an Azure Storage account inside a resource group. The service broker receives its configuration from two user-provided service instances and has the exact required set of permissions required to do its job.
Now let's see if all this works. Maybe you remember from the previous posts that the service is named rwwilden
(not that good a name anymore, but alas). There is one service plan called basic
. So we can create a service instance as follows:
Note that I introduced timing information to show how long it takes before the command returns. In this case it takes about 27s. Remember that we implemented a blocking version of service instance creation so somewhere a thread is blocked for 27s. Not the worst for these one-off operations but we could do better (which is the topic of a next post).
Let's check the Azure portal to see if a resource group is created with a storage account:
I underlined the interesting parts:
cf_org_id
and the cf_space_id
So it seems all our efforts paid of and our service broker can provision Azure Storage accounts! Let's open the Storage account itself:
As you can see it has the three tags we defined and the hard-coded properties we specified. Now let's create another service in the same org/space. The expected behavior is a new Storage account in the same resource group:
As you can see this takes about the same amount of time. A quick check in the Azure portal reveals that a second storage account is created inside the resource group:
Now let's see if deprovisioning also works by deleting the two service instances:
Both operations succeed and a check in the Azure portal reveals that both Storage accounts and the Resource Group they were a part of have disappeared.
In this (long) post we added a small Azure service library, implemented a custom Azure role for our service broker and configured the service broker to get an authorization token for performing a number of Azure operations. The primary goal for this exercise was to gain some experience implementing a real service broker. Staying with the in-memory version of the previous blog posts does not expose us to any problems we might encounter in the real world.
For this post we just implemented service provisioning and deprovisioning. The next post will handle binding and unbinding.
After that, we will turn our attention to asynchronous provisioning and binding.
]]>As in the first post, we implement (parts of) the Open Service Broker API specification. We use the OpenServiceBroker .NET library that already defines all necessary endpoints and provides implementation hooks for binding and unbinding. We use Pivotal Cloud Foundry, hosted at https://run.pivotal.io for testing our implementation and CF CLI for communicating with the platform.
All source code for this blog post can be found at: https://github.com/orangeglasses/service-broker-dotnet/tree/master.
When we want to bind a service to an application, we need an actual application. So we implement a second (empty) .NET Core application.
We now have two applications: the service broker and a client application that we can bind to, called rwwilden-client
.
In the first post we introduced a service catalog that advertised the rwwilden
service. We chose to make the service not-bindable because at that time, service binding was not implemented. When we try to bind the service anyway, an error occurs:
So we need to update the catalog to advertise a bindable service:
loading...
The only changes are at lines 14 and 32 where we set Bindable
to true
. Note that just setting Bindable
to true
at the plan level would also have been enough. Lower-level settings override higher-level ones.
Next step is to implement binding and unbinding. There are 4 different types of binding defined by the OSBAPI spec: credentials, log drain, route service and volume service. For this post we will implement the most common one: credentials. Since our service broker does not have an actual backing service, this is quite simple. In real life, you might have a MySQL service broker that provisions a database during bind and returns a connection string that allows your application to access the database.
The OSBAPI server library I used in the previous post provides hooks for implementing blocking (un)binding in the form of the IServiceBindingBlocking
interface so we just need to implement the BindAsync
and UnbindAsync
methods:
loading...
As you can see, our bind implementation simply returns a JObject
with a very secret connection string.
The final change to our code is to register the IServiceBindingBlocking
implementation with the DI container (line 4):
loading...
When we push the new service broker application, the platform (PCF) does not yet know that the service broker has changed. So when we try to bind a service to an application, this still fails with the error: the service instance doesn't support binding. To fix this, we can update the service broker using cf update-service-broker
:
With an updated service broker in place that supports binding we have finally reached the goal of this post: binding to and unbinding from the my-rwwilden
service:
With the first command we bind the rwwilden-client
application to the my-rwwilden
service and give the binding a name: client-to-service-binding-rwwilden
.
With the second command, cf env rwwilden-client
, we check whether the credentials that the service broker provides when binding, are actually injected into the rwwilden-client
application environment. And alas, there is our 'very secret connection string'.
In the first post we implemented a service broker with a service catalog and (de)provisioning of a service. In this post we actually bound the service we created to an application and saw that the credentials the service broker returned when binding were injected into the application environment.
Until now, everything was happening in-memory and there was no actual service being provisioned. In the next post we will (de)provision and (un)bind an actual service, both still as blocking operations.
]]>I this first part, the goal is to write a service broker that:
/v2/catalog
endpointSo we do not yet implement binding or unbinding, this is for a follow-up post.
A service broker allows a platform to provision service instances for applications you or someone else writes. The platform I chose to test my service broker on is Pivotal Cloud Foundry (PCF). A public implementation of this platform that is hosted and managed by Pivotal can be found at https://run.pivotal.io.
To tell the service broker what to do I will use the CF CLI which can be used to push applications to the platform, create service instances and bind them to applications (among a lot of other things).
All source code for this blog post can be found at: https://github.com/orangeglasses/service-broker-dotnet/tree/master.
Lucky for me, there is no need to implement the OSBAPI spec myself. An excellent open source OSBAPI client and server implementation already exists for .NET: https://github.com/AXOOM/OpenServiceBroker. The server library implements the entire OSBAPI interface and provides hooks you must implement to actually (de)provision and (un)bind and fetch services and service instances.
When implementing a service broker for some underlying service, you have to make a choice between implementing synchronous or asynchronous (de)provisioning and (un)binding. If the platform (PCF) and the client (CF CLI) support it, requests to the service broker contain the accepts_incomplete=true
parameter. This indicates that the platform supports polling the latest operation to check for completeness. In this case, both PCF and CF CLI support asynchronous operations.
If we want to make our service broker as generic as possible, we should implement the blocking version of the API because not all platform may support asynchronous provisioning. Therefore, for this post, we just implement IServiceInstanceBlocking
. In a later post we'll explore asynchronous provisioning.
The starting point for any service broker is its catalog, exposed on the /v2/catalog
endpoint. When using the OpenServiceBroker.NET library we need to implement the ICatalogService
. For this post we start with a simple catalog:
loading...
A catalog has services with some properties and a service has plans, nothing fancy yet. We can already deploy the application that exposes this service catalog to PCF:
We now have a service catalog up-and-running at https://rwwilden-broker.cfapps.io/v2/catalog
:
Now that we have a catalog, we need a way to create services from it. For simplicity, we implement the blocking version of service instancing: IServiceInstanceBlocking
and leave the asynchronous (deferred) version for a future post. Since we're not actually provisioning anything yet, there is little to implement except some logging statements:
loading...
We now have an application that implements a catalog and service (de)provisioning. However, the platform does not yet know that this application is a service broker. In PCF, we can use the cf create-service-broker
command to do that. This command requires the name of the service broker, its url (https://rwwilden-broker.cfapps.io
) and a username and password.
The username/password are required because communication between platform and broker is authenticated through basic authentication. So the platform and the broker share a secret (username/password) that allows them to communicate. ASP.NET Core does not support basic auth out-of-the-box so we turn to the [idunno.Authentication
][15] library. I'm not going to go into the details of configuring this, check out the Startup.cs
class in the Git repo. One thing to take into account is that in PCF, the load balancer terminates SSL. Requests to the app are sent in plain HTTP. The idunno.Authentication
requires that you explicitly allow HTTP requests since in the context of basic authentication, HTTP is a very bad idea.
The basic authentication password will of course not be hard-coded inside the application but will be read from an environment setting Authentication:Password
. So after we push the application, we can use cf set-env
to add the password to the environment.
Now that we have the app up-and-running with a catalog, service (de)provisioning and basic authentication, we can create a service broker from it via cf create-service-broker
:
The service broker we deployed exposes the rwwilden
service that should be visible in the marketplace:
And as you can see, there it is, at the bottom of the list of available services. Note that we made this a space-scoped service so it's only available in the current org and space.
Next we can create a service and delete it again and we have reached the goal of the first post of this series.
We created a service of the type rwwilden
in the basic
plan and we named it my-rwwilden
. Binding is not yet supported by this service so there are no bound apps.
Let's take a hypothetical situation where you want to correlate log messages across different components. So component A calls component B calls component C and you want to log each call and be able to see that these calls were part of the same operation. You need some correlation id.
Logging and this correlation id have nothing to do with your business logic so you do not want any logging statements in your business code and you definitely do not want to pass a 'correlation id' around everywhere. How to solve this?
One possible answer is: AsyncLocal<T>
. It allows you to persist data across asynchronous control flows. Besides, the data you store in an AsyncLocal
is local to the current asynchronous control flow. So if you have a web application that receives multiple simultaneous requests, each request sees its own async local value.
I illustrated this with a small project on Github. It contains a simple controller that returns a customer by id from some repository. The repository is injected as a dependency into the controller. The controller method also initializes an async local value:
loading...
On lines 5 and 6 I generate a new 'correlation id' (but this can be any value or object you like) and set it in a container, which I will show in a minute. Note that this correlation id does not have to be passed in the GetCustomer
call on line 9.
The CorrelationContainer
is a simple wrapper around an AsyncLocal<Guid>
:
loading...
This wrapper class is injected as a singleton dependency by Simple Injector so there is only one instance. However, the AsyncLocal
takes care of providing each asynchronous control flow (in this example each web request) with its own value.
Finally we have a decorator that does our logging. Log messages should contain the correct correlation id.
loading...
It looks at the same singleton CorrelationContainer
instance that CustomerController
used for context information and logs some messages before and after calling the decoratee. Example log messages:
Note that the same correlation id is logged before and after the await
in LoggingDecorator
. And not that nowhere did we have to pass this correlation id as a parameter in our business APIs.
And as a final note, I used SimpleInjector to illustrate the usage of AsyncLocal
in a decorator but you can use this in many more situation of course.
The main reason why is that this is the only way to guarantee consistency between environments in Azure. We have a develop, acceptance and production environment and you want these to be as similar as possible. Using a parameterized ARM template, you can guarantee this.
Azure Resource Manager provides a form of desired state configuration. You describe what your infrastructure should look like and Azure Resource Manager makes it so. If you apply a change, Azure Resource Manager makes sure your infrastructure matches this change.
And now for some tips if you want to get started with ARM.
The Azure portal provides a download link at the resource group level for the ARM template for that resource group, parameterized and all. The following screenshot tells you where to find it.
You can use this template directly for deployment to the resource group you just downloaded it from.
It is often useful to create a resource in the portal to see what it will look like in a resulting ARM template. However, there is no need to actually create the resource. When you have configured your new resource, a VM for example, you can download an ARM template representing your new resource without actually creating it. In the screenshot below I have configured a new VM and in the confirmation page you see a download link.
Azure Resource Explorer provides a view on all the resources in your subscription(s). Every resource and related resources are presented as JSON documents that you can inspect and even modify. Here's a screenshot showing an Azure Storage account:
There's already a lot to see here so I marked a few parts:
By default, you can't change anything in resource explorer. To make changes to resources, you must explicitly enable Read/Write mode.
This is the absolute url of your resource in Azure Resource Manager. As you can see, it follows a certain hierarchy: subscription → resource group → resource type → name. All operations you can run on this resource use this url.
Here you find PowerShell or Azure CLI scripts for working with this resource.
All actions you can perform on the resource are found here. The screenshot represents an Azure Storage account so you could, for example, perform a POST to the following url to retrieve the primary and secondary access keys: https://management.azure.com/subscriptions/4c70a177-b978-43f9-9fc0-1e50dd20271f/resourceGroups/horses-for-courses/providers/Microsoft.Storage/storageAccounts/rwwildenml/listKeys?api-version=2017-06-01
.
The JSON representation of the resource itself (this is different for each resource type of course). In this case, you could change the SKU or configure VNet protection (recently announced).
There are some additional properties here you could try to change like the blob endpoint but I never tried that. I don't think that will work.
Every resource type you want to address via ARM has a list of supported API versions. These are always in the following format: yyyy-MM-dd
with an optional -preview
. For example: 2017-10-01
or 2015-05-01-preview
.
How do you know what the supported API versions for a specific resource type are? You can ask the relevant resource provider either through PowerShell or through Azure CLI. I'll describe them both. In both cases I'd like to know the supported API versions for managing virtual networks via ARM.
Using PowerShell, you can run the following commands:
Login-AzureRmAccount
$networkRP = Get-AzureRmResourceProvider -ProviderNamespace "Microsoft.Network"
$networkRP.ResourceTypes | where { $_.ResourceTypeName -eq "virtualNetworks" }
The result should look like this:
As you can see, we have a list of supported API versions and also the locations that support a specific resource type.
If you want to use Azure CLI, you can run the following script:
$ az login
$ az provider list --query \
"[?namespace=='Microsoft.Network'].resourceTypes[] | [?resourceType=='virtualNetworks'].apiVersions[]"
[
"2017-11-01",
"2017-10-01",
"2017-09-01",
"2017-08-01",
"2017-06-01",
"2017-04-01",
"2017-03-01",
"2016-12-01",
"2016-11-01",
"2016-10-01",
"2016-09-01",
"2016-08-01",
"2016-07-01",
"2016-06-01",
"2016-03-30",
"2015-06-15",
"2015-05-01-preview",
"2014-12-01-preview"
]
The az provider list
command lists the details for all Azure Resource Providers as JSON. You can use JMESPath queries to extract results from this JSON.
For some resources you can not use Azure Resource Explorer. If you want to go really low-level you can visit https://resources.azure.com/raw/. For example, for a customer we have an OMS (Log Analytics) workspace. This workspace has a number of data sources that you can not inspect in Azure Resource Explorer:
Apparently you have to apply a filter and Resource Explorer does not support that. So let's turn to the raw version and see what we can do there:
We can now do a GET request with the required kind
parameter and we see all data sources of the performanceCounter
kind.
Besides GET requests, you can also perform all the other operations on your resources: PUT, POST, DELETE and PATCH.
Sometimes when you download an automation template (tip 1) you get a warning message stating that: resource types cannot be exported yet and are not included in the template.
In this case, one of the resource types that can not be exported is Microsoft.KeyVault/vaults/accessPolicies
. In my case, I would actually like these access policies to be part of the ARM template but we don't know what this should look like because they weren't exported. So what can we do?
There are several options:
Well, actually, that was it. Hope it helped :)
]]>The documentation is still a little behind and in some cases not even correct so I hope this post helps in creating versioned API's from scratch.
First of all, why would we use the Azure REST API for this and not the Azure portal or maybe PowerShell? Three reasons:
I suppose that PowerShell and (better) Azure portal support for API Version Sets will become available in the near future but until then, this post is a detailed guide to get you started with this nice addition to API Management.
If we want to use the Azure REST API, we need a JWT token. I already wrote about how to get a token when using PowerShell so for that I direct you to a previous post.
There isn't actually any documentation yet on creating an API Version Set using the REST API. I got the necessary details from this post and a lot of trial and error. The first step is actually creating the API Version Set:
# Create the body of the PUT request to the REST API.
$versionSetDisplayName = "My version set"
$createOrUpdateApiVersionSetBody = @{
name = $versionSetDisplayName
versioningScheme = "Header"
versionHeaderName = "X-Api-Version"
}
# Send PUT request to the correct endpoint for creating an API Version Set.
$subscriptionId = "01234567-89ab-cdef-0123-456789abcdef"
$resourceGroupName = "MyResourceGroup"
$apimServiceName = "myapiminstance"
$apimVersionSetName = "my-version-set"
$apimApiVersion = "2018-01-01"
$apiVersionSet = Invoke-RestMethod `
-Method Put `
-Uri ("https://management.azure.com/subscriptions/" + $subscriptionId +
"/resourceGroups/" + $resourceGroupName +
"/providers/Microsoft.ApiManagement/service/" + $apimServiceName +
"/api-version-sets/" + $apimVersionSetName +
"?api-version=" + $apimApiVersion) `
-Headers @{ Authorization = ("Bearer " + $accessToken)
"Content-Type" = "application/json" } `
-Body ($createOrUpdateApiVersionSetBody | ConvertTo-Json -Compress -Depth 3)
Write-Host ("Created or updated APIM version set: " +
$apiVersionSet.properties.displayName +
" (" + $apiVersionSet.id + ")")
First, on lines 1 to 8 we create the body for the PUT request. Note that the name
you specify one line 5 is the display name and not the name of the API Version Set. I specify the Header
versioning scheme so I have to specify a header name as well.
On lines 10 to 26 a PUT request is executed via the Invoke-RestMethod
PowerShell cmdlet. This can be broken down into the following steps:
https://management.azure.com/subscriptions/01234567-89ab-cdef-0123-456789abcdef/resourceGroups/MyResourceGroup/providers/Microsoft.ApiManagement/service/my-apim/api-version-sets/my-version-set?api-version=2018-01-01
Authorization
header with the access tokenWe now have an API version set that we can use when creating a new versioned API. You do not see this version set anywhere in the portal, so the only way to check what happened is through another REST API request:
$apiVersionSet = Invoke-RestMethod `
-Method Get `
-Uri ("https://management.azure.com/subscriptions/" + $subscriptionId +
"/resourceGroups/" + $resourceGroupName +
"/providers/Microsoft.ApiManagement/service/" + $apimServiceName +
"/api-version-sets/" + $apimVersionSetName +
"?api-version=" + $apimApiVersion) `
-Headers @{ Authorization = ("Bearer " + $accessToken)
"Content-Type" = "application/json" }
The resulting object is a PSCustomObject
like id
, name
an properties
.
Now that we have an API Version Set we can add our first API version to it. This must be done with another PUT request as follows:
# Create body for PUT request to create new API.
$apiDescription = "My wonderful API"
$apiDisplayName = "My wonderful API"
$apiPath = "my-api"
$backendServiceUrl = "https://my-backend-api.com"
$createOrUpdateApiBody = @{
properties = @{
description = $apiDescription
apiVersion = "v1"
apiVersionSetId = $apiVersionSet.id
displayName = $apiDisplayName
path = $apiPath
protocols = , "https"
serviceUrl = $backendServiceUrl
}
}
# Send PUT request for creating/updating a versioned API.
$apimApiId = "my-api-v1"
$restApi = Invoke-RestMethod `
-Method Put `
-Uri ("https://management.azure.com/subscriptions/" + $subscriptionId +
"/resourceGroups/" + $resourceGroupName +
"/providers/Microsoft.ApiManagement/service/" + $apimServiceName +
"/apis/" + $apimApiId +
"?api-version=" + $apimApiVersion) `
-Headers @{ Authorization = ("Bearer " + $accessToken)
"Content-Type" = "application/json" } `
-Body ($createOrUpdateApiBody | ConvertTo-Json -Compress -Depth 3)
The idea is the same as for the API version set:
When we take a look in the portal, we can now see what happened. We have an API Version Set that contains all versions of the API:
And a v1 version of the API that is a part of the version set:
So that is how you create versioned API's in Azure API Management :)
]]>Getting the access token follows the same steps as described in my earlier post:
$rmAccount = Add-AzureRmAccount -SubscriptionId $subscriptionId
$tenantId = (Get-AzureRmSubscription -SubscriptionId $subscriptionId).TenantId
$tokenCache = $rmAccount.Context.TokenCache
$cachedTokens = $tokenCache.ReadItems() `
| where { $_.TenantId -eq $tenantId } `
| Sort-Object -Property ExpiresOn -Descending
$accessToken = cachedTokens[0].AccessToken
Of course, you have to login using an account that has sufficient permissions to access the REST API.
We can now use the token to call the REST API. For example, to retrieve all the resource groups in a subscription. The easiest way is via the Invoke-RestMethod
PowerShell cmdlet:
$apiVersion = "2017-05-10"
Invoke-RestMethod -Method Get `
-Uri ("https://management.azure.com/subscriptions/" + $subscriptionId +
"/resourcegroups" +
"?api-version=" + $apiVersion) `
-Headers @{ "Authorization" = "Bearer " + $accessToken }
UPDATE (2018-02-12): The method described below does not work, unfortunately. Connect-AzureAD
runs without error but the AD context you get is not authorized to perform AD operations. I get errors that look like this:
Get-AzureADApplication : Error occurred while executing GetApplications
Code: Authentication_MissingOrMalformed
Message: Access Token missing or malformed.
RequestId: 1f15adc8-1cf5-443b-b78d-88db66701506
DateTimeStamp: Mon, 12 Feb 2018 16:43:42 GMT
HttpStatusCode: Unauthorized
HttpStatusDescription: Unauthorized
HttpResponseStatus: Completed
The access token is missing or malformed. I'm trying to figure out what goes wrong since an access token is actually provided (so it can not be missing). But 'malformed' is also strange because this is the token I get back from Add-AzureRmAccount
.
Checking the actual access token in jwt.io proves that is isn't malformed. However, the token audience is https://management.core.windows.net/
. This is probably not the audience that is expected when authenticating against Azure AD (unfortunately we can not inspect this token). So that is probably why the token is 'malformed'.
This means I'm stuck with a double login when using both Add-AzureRmAccount
and Connect-AzureAD
in one PowerShell script... If someone knows a solution, please leave a comment :)
UPDATE (2018-02-13): I also found out that it doesn't really matter what you pass as access token to Connect-AzureAD
. The following runs without error: Connect-AzureAD -TenantId $tenantId -AadAccessToken "this is no token" -AccountId $accountId
. Errors happen only later when you try to run operations against Azure AD.
I had to write a PowerShell script that connected to Azure Resource Manager via Add-AzureRmAccount
and to Azure AD via Connect-AzureAD
. If you write your script like this:
Add-AzureRmAccount -SubscriptionId $subscriptionId
Connect-AzureAD -TenantId $tenantId
you are presented twice with this login dialog:
This is of course annoying for users of my script so I set out to improve this. The end result looks like this:
$rmAccount = Add-AzureRmAccount -SubscriptionId $subscriptionId
$tenantId = (Get-AzureRmSubscription -SubscriptionId $subscriptionId).TenantId
$tokenCache = $rmAccount.Context.TokenCache
$cachedTokens = $tokenCache.ReadItems() `
| where { $_.TenantId -eq $tenantId } `
| Sort-Object -Property ExpiresOn -Descending
Connect-AzureAD -TenantId $tenantId `
-AadAccessToken $cachedTokens[0].AccessToken `
-AccountId $rmAccount.Context.Account.Id
Let's dissect this:
Microsoft.IdentityModel.Clients.ActiveDirectory.TokenCache
from the ADAL library.ReadItems()
method, filtering on tenant id and getting the most recent one.And that's how we prevent a double login in PowerShell scripts that use both Add-AzureRmAccount
and Connect-AzureAD
.
This is an undesirable situation because:
The reason behind the latter is that Azure does not allow the removal of Inbound NAT pools and NAT rules when they are in use by a VMSS. So if you deploy a ARM template that does not have all the Inbound NAT rules that you also see in the Azure portal, you get an error message:
Cannot remove inbound nat pool DebuggerListenerNatPool-8ypmdj7pp8 from load balancer since it is in use by virtual machine scale set /subscriptions/<subscription id>/resourceGroups/ClusterResourceGroupDEV/providers/Microsoft.Compute/virtualMachineScaleSets/Backend
If you try to remove an Inbound NAT rule via the portal you get an even nicer message:
Failed to delete inbound NAT rule 'DebuggerListenerNatPool-2zqjmhjv3q.0'. Error: Adding or updating NAT Rules when NAT pool is present on loadbalancer /subscriptions/<subscription id>/resourceGroups/ClusterResourceGroupDEV/providers/Microsoft.Network/loadBalancers/LB-sfdev-Backend is not supported. To modify the load balancer, pass in all NAT rules unchanged or remove the LoadBalancerInboundNatRules property from your PUT request
And the portal actually warns you that this is not yet supported so we could have known beforehand:
So what if you actually do want to remove these Inbound NAT rules? Or you want to remove the default NAT rules that allows RDP access to your SF cluster VMs? Googling around I couldn't really find a solution, only people with the same question so I thought: let's find a way to do this.
The error messages provide a valuable clue: you can not modify NAT rules because they are in use by the VMSS. So let's check Azure Resource Explorer to see if we can find a link between the VMSS and these NAT pools. This link exists and here they are:
I selected our Frontend
VMSS and scrolled down to the network profile. There we have four Inbound NAT pools that you can just remove using Azure Resource Explorer so it should look like this:
So now the link between the VMSS and the NAT pools no longer exists. We can now navigate to the load balancer and remove the NAT pools there as well:
We should now be in a situation where there are no longer any NAT pools we do not want. This means we can redeploy our SF cluster ARM template again and everything is back to normal.
Note that a similar approach can be used for adding/updating/deleting NAT rules. The only thing you have to do is remove the link between the VMSS and the corresponding NAT pool, make your changes and reapply the link.
]]>Spring Cloud Config server offers a simple API for retreiving app configuration settings. Client libraries exist for numerous languages. For C#, Steeltoe offers integration with config server. It has a lot more to offer but that's a topic for future posts.
Source code for this post can be found here.
I'm working on a small demo application that should, when finished, show most Steeltoe features. In this first post, I focus on configuration. The demo app itself is based on an API owned by the Dutch Ministry of Foreign Affairs that issues travel advisories. This API is divided into two parts:
The application fetches and caches this data to represent it to clients in a more accessible format. Furthermore, it should detect travel advisory changes to be able to notify clients of the API that a travel advisory for a specific country has changed.
The application starts with a periodic fetch of the list of countries. Fetching this list is implemented by the 'world fetcher' micro service. This service needs two configuration settings: the base url to fetch the data from and the polling interval. So let's see how to configure Spring Cloud Config server to deliver these settings.
First of all we're going to run Spring Cloud Config server locally. This is quite easy because someone has already packed everything inside a Docker container: hyness/spring-cloud-config-server
. So we can do a docker pull hyness/spring-cloud-config-server
and then we run the following command:
docker run -it \
--name=spring-cloud-config-server \
-p 8888:8888 \
-e SPRING_CLOUD_CONFIG_SERVER_GIT_URI=https://github.com/rwwilden/steeltoe-demo-config \
hyness/spring-cloud-config-server
So we give the Docker process a nice name: spring-cloud-config-server
, map port 8888
and specify an environment variable with the name SPRING_CLOUD_CONFIG_SERVER_GIT_URI
. This should point to a Git repo with configuration that can be read by Spring Cloud Config server. For the moment, the only configuration file there is worldfetch.yaml
:
loading...
If you have started the Docker container, you can run curl http://localhost:8888/worldfetch/development
and you get back a nice JSON response with the two configured values.
So we have a running config server that serves configuration from a Github repo. How do we get this configuration inside our ASP.NET Core micro service? The answer is Steeltoe. Steeltoe is a collection of libraries that allows interfacing from a .NET app with a number of Spring Cloud components (like config server).
First step is to configure the location of the config server. Since we're still running only locally, this is http://localhost:8888
which we specify in appsettings.Development.json
:
loading...
Next step is adding the Steeltoe configuration provider in Program.cs
:
loading...
Note I use the ConfigureAppConfiguration
method, introduced in ASP.NET Core 2.0 and well documented here. On line 17 the config server is added as a configuration provider.
Next we need another configuration setting. Remember what we named our config file on Github: worldfetch.yaml
. The Steeltoe configuration provider must know the name of our application so that it can collect the right configuration settings. This one we define in appsettings.json
:
loading...
Final step is to implement an options class to represent our settings so that we can inject them into other classes. This class is quite simple in our case because we have just two settings in worldfetch.yaml
:
loading...
Now all that is left to do is inject an IOptions<FetcherOptions>
where we want to access the configuration settings from worldfetch.yaml
and we're done: configuration through Spring Cloud Config server from a Github repo.
We now have a small ASP.NET Core application that is configured via Spring Cloud Config server and fetches data from some URL. Next time we're going to run all this in 'the cloud'!
]]>First of all, you can run Docker containers on Azure using Azure Container Instances. ACI is not a container orchestrator like Kubernetes (AKS) but it's ideal for quickly getting single containers up-and-running. The fastest way to run a container is through the Azure CLI. You can find the CLI directly from the portal:
Once you have started the CLI, type or paste the following commands:
az configure --defaults location=westeurope
az group create --name DockerTest
az container create \
--resource-group DockerTest \
--name winservercore \
--image "microsoft/iis:nanoserver" \
--ip-address public \
--ports 80 \
--os-type windows
The first command sets the default resource location to westeurope
so you do not have to specify this for each command. The second command creates a resource group named DockerTest
and the third command starts a simple Windows Server container with the Nano Server OS, running IIS.
You need to specify a number of parameters when creating a container:
microsoft/iis:nanoserver
Once you have run these commands, you can check progress via:
az container list --resource-group DockerTest -o table
And once the container has been provisioned, you should get something like this:
The container has received a public IP address, in my case 52.233.138.192
and when we go there, you see the default IIS welcome page.
Tadaaa, your first Windows Server Container running on Azure.
]]>appsettings.json
and appsettings.Development.json
that get generated when you run dotnet new
. First appsettings.json
:loading...
Pretty straightforward: default log levels for debug and console are set to Warning
. And now appsettings.Development.json
:
loading...
The way I interpret this, but which is apparently wrong, is as follows: in a development environment the default log level is Debug
so if I do LogDebug
, it will appear on stdout. Well, it does not… (otherwise I would not have written this post)
I think this is counter-intuitive, especially since this is the default that gets generated when you run dotnet new
. Why have this default when it does not result in debug logging? And what does this default accomplish anyhow?
What you need to do in appsettings.Development.json
is explicitly configure console logging and set the desired logging levels:
loading...
I still do not quite understand what the default log level on line 5 does. The keyword Console
on line 9 refers to the console logging provider. There are a number of other logging providers but there is no such thing as a 'default logging provider'. After some more careful reading of the documentation, it appears that the default filter rule applies to 'all other providers'. These are the providers that you do not explicitly specify in your appsettings.json
or appsettings.Development.json
files.
Now it begins to make sense I guess: the two configuration files are merged and the most specific rule is selected. In the case of the settings files that are generated by default, this means that the console rule with log level warning is selected. You can override this by specifying another console rule in appsettings.Development.json
.
I took some time to come up with a good enough design for this and decided on the following:
Since I have never written anything in Elm and my knowledge of SignalR is a little outdated, I decided to start very simple: a SignalR hub that increments an int every five seconds and sends it to all clients. The number that's received by each client is used to update an Elm view model. In the real world, the int will become the JSON document describing the results of the smoke tests and we build a nice view for it, you get the idea.
All source code for this post can be found here.
First of all, what do things look like on the server and how do we build the application? It will be an ASP.NET Core app so we start with:
dotnet new web
dotnet add package Microsoft.AspNetCore.SignalR -v 1.0.0-alpha2-final
We create an empty ASP.NET Core website and add the latest version of SignalR. Next we need to configure SignalR in our Startup
class:
loading...
The code speaks for itself, I guess. We add SignalR dependencies to the services collection and configure a hub called SmokeHub
which can be reached from the client via the route /smoke
.
On line 15 you can see I add a IHostedService
implementation: CounterHostedService
. A hosted service is an object with a start and a stop method that is managed by the host. This means that when ASP.NET Core starts, it calls the hosted service start method and when ASP.NET Core (gracefully) shuts down, it calls the stop method. In our case, we use it to start a very simple scheduler that increments an integer every five seconds and sends it to all SignalR clients. Here are two posts on implementing your own IHostedService
.
First of all, we need the SignalR client library. You can get it via npm. I added it in the wwwroot/js/lib folder
.
Now let's take a look at the Elm code.
loading...
Let's dissect the code:
Int
that we initialize to 1
The question is, where do we receive counter updates from? Elm is a pure functional language. This means that the output of every function in Elm depends only on its arguments, regardless of global and/or local state. Direct communication with Javascript from Elm would break this so that is not allowed. So all interop with the outside world is done through ports.
If we check the Elm code again, you see at line 1 we declare our module with the keyword port
. On line 30 we declare a port that listens to counter updates from Javascript. So now we can plug it all together in our index.html
file:
loading...
Most of the code speaks for itself. On line 22 we invoke the port in our Elm app to pass the updated counter to Elm. Line 25 is a simple test to assure that we can also send message from the client to the SignalR hub.
For completeness' sake, here is the code for the SmokeHub
:
loading...
Note that the Send
method is called by JavaScript clients. It is not the same as the Send
that is called when notifying all clients of a counter update.
All parts:
I finished the previous post thinking I was done, except a few small changes. Unfortunately, that wasn't true. Remember we had to provide an explicit command line because of classpath requirements. This classpath wasn't yet complete. Let's analyze the start.sh
file again:
#!/usr/bin/env bash
# Java options and system properties to pass to the JVM when starting the service. For example:
# JVM_OPTIONS="-Xrs -Xms128m -Xmx128m -Dmy.system.property=/var/share"
JVM_OPTIONS="-Xrs -Xms128m -Xmx128m"
SERVER_PORT=--server.port=8082
# set max size of request header to 64Kb
MAX_HTTP_HEADER_SIZE=--server.tomcat.max-http-header-size=65536
BASEDIR=$(dirname $0)
CLASS_PATH=.:config:bin:lib/*
CLASS_NAME="com.sdl.delivery.service.ServiceContainer"
PID_FILE="sdl-service-container.pid"
cd $BASEDIR/..
if [ -f $PID_FILE ]
then
if ps -p $(cat $PID_FILE) > /dev/null
then
echo "The service already started."
echo "To start service again, run stop.sh first."
exit 0
fi
fi
ARGUMENTS=()
for ARG in $@
do
if [[ $ARG == --server\.port=* ]]
then
SERVER_PORT=$ARG
elif [[ $ARG =~ -D.+ ]]; then
JVM_OPTIONS=$JVM_OPTIONS" "$ARG
else
ARGUMENTS+=($ARG)
fi
done
ARGUMENTS+=($SERVER_PORT)
ARGUMENTS+=($MAX_HTTP_HEADER_SIZE)
for SERVICE_DIR in `find services -type d`
do
CLASS_PATH=$SERVICE_DIR:$SERVICE_DIR/*:$CLASS_PATH
done
echo "Starting service."
java -cp $CLASS_PATH $JVM_OPTIONS $CLASS_NAME ${ARGUMENTS[@]} & echo $! > $PID_FILE
At line 12 the classpath is set to .:config:bin:lib/*
. We ended the previous post with a classpath of $PWD/*:.:$PWD/lib/*:$PWD/config/*
, not quite the same. Furthermore, on lines 42..45, additional folders are added to the classpath. Taking all this into account, we get the following classpath: $PWD/*:.:$PWD/lib/*:$PWD/config:$PWD/services/discovery-service/*:$PWD/services/odata-v4-framework/*
and the following manifest.yml
:
---
applications:
- name: discovery_service
path: ./
buildpack: java_buildpack_offline
command: $PWD/.java-buildpack/open_jdk_jre/bin/java -cp $PWD/*:.:$PWD/lib/*:$PWD/config:$PWD/services/discovery-service/*:$PWD/services/odata-v4-framework/* com.sdl.delivery.service.ServiceContainer -Xrs -Xms128m -Xmx128m
env:
JBP_CONFIG_JAVA_MAIN: '{ java_main_class: "com.sdl.delivery.service.ServiceContainer", arguments: "-Xrs -Xms128m -Xmx128m" }'
JBP_LOG_LEVEL: DEBUG
Now that we have fixed the classpath, let's see if the discovery service still runs when we push it.
0 of 1 instances running, 1 starting
0 of 1 instances running, 1 crashed
FAILED
Error restarting application: Start unsuccessful
TIP: use 'cf logs discovery_service --recent' for more information
Ok, that is unfortunate, we broke it again. Let's check the log files again:
[APP/PROC/WEB/0] OUT '#b
[APP/PROC/WEB/0] OUT @# ,###
[APP/PROC/WEB/0] OUT ########## @##########Mw #### ########^
[APP/PROC/WEB/0] OUT #####%554WC @#############p j#### ##"@#m
[APP/PROC/WEB/0] OUT j####, @#### 1#### j#### ## "
[APP/PROC/WEB/0] OUT %######M, @#### j#### j####
[APP/PROC/WEB/0] OUT "%######m @#### j#### j####
[APP/PROC/WEB/0] OUT "#### @#### {#### j####
[APP/PROC/WEB/0] OUT ]##MmmM##### @#############C j###########
[APP/PROC/WEB/0] OUT %#########" @#########MM^ ###########
[APP/PROC/WEB/0] OUT :: Service Container :: Spring Boot (v1.4.1.RELEASE) ::
[APP/PROC/WEB/0] OUT Exit status 0
[CELL/0] OUT Exit status 0
[CELL/0] OUT Stopping instance ef44cf20-b9da-48c6-5edc-a6d7
[CELL/0] OUT Destroying container
[API/0] OUT Process has crashed with type: "web"
[API/0] OUT App instance exited with guid e9a00d0c-86b4-4dad-ae5d-e4208f09590f payload: {"instance"=>"ef44cf20-b9da-48c6-5edc-a6d7", "index"=>0, "reason"=>"CRASHED", "exit_description"=>"Codependent step exited", "crash_count"=>4, "crash_timestamp"=>1513173007899100032, "version"=>"692f3c6a-acf3-4adc-b870-3827355948d6"}
[CELL/0] OUT Successfully destroyed container
Not very informative... This just tells us that something went wrong but not what went wrong. It should be possible to get more logging than this. Lucky for us, it is.
In my config/logback.xml
file, a number of RollingFileAppender
s were configured (this may be different for your configuration). These were setup to log to a local folder. This isn't going to fly on CloudFoundry of course, we should log to stdout and let the platform manage the rest. So I modified logback.xml
:
<?xml version="1.0" encoding="UTF-8"?>
<configuration scan="true">
<!-- Properties -->
<property name="log.pattern" value="%date %-5level %logger{0} - %message%n"/>
<property name="log.level" value="DEBUG"/>
<property name="log.encoding" value="UTF-8"/>
<!-- Appenders -->
<appender name="stdout" class="ch.qos.logback.core.ConsoleAppender">
<encoder>
<charset>${log.encoding}</charset>
<pattern>${log.pattern}</pattern>
</encoder>
</appender>
<!-- Loggers -->
<logger name="com" level="${log.level}">
<appender-ref ref="stdout"/>
</logger>
<root level="ERROR">
<appender-ref ref="stdout"/>
</root>
</configuration>
This should take care of logging everything to stdout. If we push the app now, we get a lot of logging and in my case, the discovery service still crashes. But at least now I can see why:
[APP/PROC/WEB/0] OUT DEBUG SQLServerConnection - ConnectionID:1 Connecting with server: DBSERVER port: 1433 Timeout slice: 4800 Timeout Full: 15
[APP/PROC/WEB/0] OUT DEBUG SQLServerConnection - ConnectionID:1 This attempt No: 3
[APP/PROC/WEB/0] OUT DEBUG SQLServerException - *** SQLException:ConnectionID:1 com.microsoft.sqlserver.jdbc.SQLServerException: The TCP/IP connection to the host DBSERVER, port 1433 has failed. Error: "DBSERVER. Verify the connection properties. Make sure that an instance of SQL Server is running on the host and accepting TCP/IP connections at the port. Make sure that TCP connections to the port are not blocked by a firewall.". The TCP/IP connection to the host DBSERVER, port 1433 has failed. Error: "DBSERVER. Verify the connection properties. Make sure that an instance of SQL Server is running on the host and accepting TCP/IP connections at the port. Make sure that TCP connections to the port are not blocked by a firewall.".
The service attempts to connect to a database named DBSERVER
. I have not yet configured the discovery database so this makes sense.
All in all, we're again one step further in deploying SDL Tridion Web 8.5 Discovery Service on CloudFoundry.
]]>This is just part 1 of a series of unknown length (at the moment of writing). Here are all parts:
The discovery service is distributed as a binary Spring Boot application with the following directory structure:
│README.md
├bin
│ start.sh
│ stop.sh
├config
│ application.properties
│ cd_ambient_conf.xml
│ cd_ambient_conf.xml.org
│ cd_storage_conf.xml
│ logback.xml
│ serviceName.txt
├lib
│ ....
│ service-container-core-8.5.0-1014.jar
│ ....
└services
├discovery-service
└odata-v4-framework
So there's a bin
folder with a start and stop script, some configuration and a lib
folder that has a lot of jar files, including the one with our main class.
Since this is a binary distribution of a micro service, I first tried the CloudFoundry binary buildpack. A build pack is a small piece of software that takes your source code, compiles it and runs it on CloudFoundry (this is a very simplistic explanation). Let's see how far the binary buildpack gets us.
$ cf push discovery_service -b binary_buildpack -c './bin/start.sh' -i 1 -m 128m
Creating app discovery_service in org PCF / space Test as admin...
OK
Creating route discovery-service.cf-prod.intranet...
OK
Binding discovery-service.cf-prod.intranet to discovery_service...
OK
Uploading discovery_service...
Uploading app files from: /home/wildenbergr/microservices/discovery
Uploading 7.2M, 72 files
Done uploading
OK
Starting app discovery_service in org PCF / space Test as admin...
Downloading binary_buildpack...
Downloaded binary_buildpack
Creating container
Successfully created container
Downloading app package...
Downloaded app package (59.3M)
Staging...
-------> Buildpack version 1.0.13
Exit status 0
Staging complete
Uploading droplet, build artifacts cache...
Uploading build artifacts cache...
Uploading droplet...
Uploaded build artifacts cache (200B)
Uploaded droplet (59.3M)
Uploading complete
Destroying container
Successfully destroyed container
0 of 1 instances running, 1 crashed
FAILED
Error restarting application: Start unsuccessful
TIP: use 'cf logs discovery_service --recent' for more information
$
Obviously, the deploy did not go as planned so let's check the logs:
$ cf logs discovery_service --recent
Retrieving logs for app discovery_service in org PCF / space Test as admin...
[API/0] OUT Created app with guid fd8dd243-bc3f-4a26-83f7-44b8a06d95dd
[API/1] OUT Updated app with guid fd8dd243-bc3f-4a26-83f7-44b8a06d95dd ({"route"=>"5c279e23-17a0-48d6-b6dd-0c7fe8cbf17b", :verb=>"add", :relation=>"routes", :related_guid=>"5c279e23-17a0-48d6-b6dd-0c7fe8cbf17b"})
[API/0] OUT Updated app with guid fd8dd243-bc3f-4a26-83f7-44b8a06d95dd ({"state"=>"STARTED"})
[STG/0] OUT Downloading binary_buildpack...
[STG/0] OUT Downloaded binary_buildpack
[STG/0] OUT Creating container
[STG/0] OUT Successfully created container
[STG/0] OUT Downloading app package...
[STG/0] OUT Downloaded app package (59.3M)
[STG/0] OUT Staging...
[STG/0] OUT -------> Buildpack version 1.0.13
[STG/0] OUT Exit status 0
[STG/0] OUT Staging complete
[STG/0] OUT Uploading droplet, build artifacts cache...
[STG/0] OUT Uploading build artifacts cache...
[STG/0] OUT Uploading droplet...
[STG/0] OUT Uploaded build artifacts cache (200B)
[STG/0] OUT Uploaded droplet (59.3M)
[STG/0] OUT Uploading complete
[STG/0] OUT Destroying container
[CELL/0] OUT Creating container
[CELL/0] OUT Successfully created container
[STG/0] OUT Successfully destroyed container
[CELL/0] OUT Starting health monitoring of container
[APP/PROC/WEB/0] OUT Starting service.
[APP/PROC/WEB/0] ERR ./bin/start.sh: line 49: java: command not found
[APP/PROC/WEB/0] OUT Exit status 0
[CELL/0] OUT Exit status 143
[CELL/0] OUT Destroying container
[API/2] OUT Process has crashed with type: "web"
[API/2] OUT App instance exited with guid fd8dd243-bc3f-4a26-83f7-44b8a06d95dd payload: {"instance"=>"", "index"=>0, "reason"=>"CRASHED", "exit_description"=>"2 error(s) occurred:\n\n* 2 error(s) occurred:\n\n* Codependent step exited\n* cancelled\n* cancelled", "crash_count"=>1, "crash_timestamp"=>1512986370928003691, "version"=>"26a55501-fbae-4e1e-87d0-4704f9ad0c78"}
And there we have it at line 29: the java
command was not found. Makes sense of course because we used the binary buildpack that doesn't know anything about Java.
Ok, so the binary buildpack is a no-go. This would suggest we go with the Java buildpack. On the other hand, this buildpack by default assumes you push source code that needs to be compiled. Let's see what happens.
$ cf push discovery_service -b java_buildpack_offline -c './bin/start.sh' -i 1 -m 128m
Updating app discovery_service in org PCF / space Test as admin...
OK
Uploading discovery_service...
Uploading app files from: /home/wildenbergr/microservices/discovery
Uploading 7.2M, 72 files
Done uploading
OK
Stopping app discovery_service in org PCF / space Test as admin...
OK
Starting app discovery_service in org PCF / space Test as admin...
Downloading java_buildpack_offline...
Downloaded java_buildpack_offline
Creating container
Successfully created container
Downloading app package...
Downloaded app package (59.3M)
Downloading build artifacts cache...
Downloaded build artifacts cache (200B)
Staging...
-----> Java Buildpack Version: v3.17 (offline) | https://github.com/cloudfoundry/java-buildpack.git#87fb619
[Buildpack] ERROR Compile failed with exception #<RuntimeError: No container can run this application. Please ensure that you've pushed a valid JVM artifact or artifacts using the -p command line argument or path manifest entry. Information about valid JVM artifacts can be found at https://github.com/cloudfoundry/java-buildpack#additional-documentation. >
No container can run this application. Please ensure that you've pushed a valid JVM artifact or artifacts using the -p command line argument or path manifest entry. Information about valid JVM artifacts can be found at https://github.com/cloudfoundry/java-buildpack#additional-documentation.
Failed to compile droplet
Exit status 223
Staging failed: Exited with status 223
Destroying container
Successfully destroyed container
FAILED
Error restarting application: BuildpackCompileFailed
TIP: use 'cf logs discovery_service --recent' for more information
And this fails as well. The Java buildpack doesn't understand what we are pushing. So with the binary buildpack we can run a shell script but we do not have java
. With the Java buildpack we have java
but it doesn't understand the artifact we're pushing. What to do?
Digging around in the Java buildpack documentation, it looks like there is an option to run a self-executable jar file. The jar file we'd like to execute is lib/service-container-core-8.5.0-1014.jar
. Let's take a look at the start.sh
script that is normally used to run the discovery micro service:
#!/usr/bin/env bash
# Java options and system properties to pass to the JVM when starting the service. For example:
# JVM_OPTIONS="-Xrs -Xms128m -Xmx128m -Dmy.system.property=/var/share"
JVM_OPTIONS="-Xrs -Xms128m -Xmx128m"
SERVER_PORT=--server.port=8082
# set max size of request header to 64Kb
MAX_HTTP_HEADER_SIZE=--server.tomcat.max-http-header-size=65536
BASEDIR=$(dirname $0)
CLASS_PATH=.:config:bin:lib/*
CLASS_NAME="com.sdl.delivery.service.ServiceContainer"
cd $BASEDIR/..
ARGUMENTS=()
for ARG in $@
do
if [[ $ARG == --server\.port=* ]]
then
SERVER_PORT=$ARG
elif [[ $ARG =~ -D.+ ]]; then
JVM_OPTIONS=$JVM_OPTIONS" "$ARG
else
ARGUMENTS+=($ARG)
fi
done
ARGUMENTS+=($SERVER_PORT)
ARGUMENTS+=($MAX_HTTP_HEADER_SIZE)
for SERVICE_DIR in `find services -type d`
do
CLASS_PATH=$SERVICE_DIR:$SERVICE_DIR/*:$CLASS_PATH
done
echo "Starting service."
java -cp $CLASS_PATH $JVM_OPTIONS $CLASS_NAME ${ARGUMENTS[@]}
A lot is going on in here but in the end the script runs the java
command with a classpath, a main class and some options. Maybe we can accomplish the same with the Java buildpack. So, first let's create a manifest.yml
file in the root of the micro service folder structure:
---
applications:
- name: discovery_service
path: lib/service-container-core-8.5.0-1014.jar
buildpack: java_buildpack_offline
The path
points to the jar file that has the class com.sdl.delivery.service.ServiceContainer
with a main()
method. However, if we deploy with this manifest, we get the same error: No container can run this application
. So what is going on?
When running a Java application directly from a jar file, java has to know which class has the main()
method. You can specify this on the command line or inside a manifest file inside the jar file. The service-container-core-8.5.0-1014.jar
manifest file does not have a Main-Class
entry so we have to specify it on the command line. How to do that?
Digging some more through the Java buildpack documentation I found that you can override buildpack settings by setting application environment variables. In our case, we want to override settings from the config/java_main.yml
file so we update our manifest.yml
file again:
---
applications:
- name: discovery-service
path: lib/service-container-core-8.5.0-1014.jar
buildpack: java_buildpack_offline
env:
JBP_CONFIG_JAVA_MAIN: '{ java_main_class: "com.sdl.delivery.service.ServiceContainer", arguments: "-Xrs -Xms128m -Xmx128m" }'
JBP_LOG_LEVEL: DEBUG
Let's see what happens this time:
[CELL/0] OUT Creating container
[CELL/0] OUT Successfully created container
[STG/0] OUT Successfully destroyed container
[CELL/0] OUT Starting health monitoring of container
[APP/PROC/WEB/0] ERR Exception in thread "main" java.lang.NoClassDefFoundError: org/slf4j/LoggerFactory
[APP/PROC/WEB/0] ERR at com.sdl.delivery.service.ServiceContainer.<clinit>(ServiceContainer.java:57)
[APP/PROC/WEB/0] ERR Caused by: java.lang.ClassNotFoundException: org.slf4j.LoggerFactory
[APP/PROC/WEB/0] ERR at java.net.URLClassLoader.findClass(URLClassLoader.java:381)
[APP/PROC/WEB/0] ERR at java.lang.ClassLoader.loadClass(ClassLoader.java:424)
[APP/PROC/WEB/0] ERR at sun.misc.Launcher$AppClassLoader.loadClass(Launcher.java:335)
[APP/PROC/WEB/0] ERR at java.lang.ClassLoader.loadClass(ClassLoader.java:357)
[APP/PROC/WEB/0] ERR ... 1 more
[APP/PROC/WEB/0] OUT Exit status 1
[CELL/0] OUT Exit status 0
[CELL/0] OUT Destroying container
[API/0] OUT Process has crashed with type: "web"
[API/0] OUT App instance exited with guid da7e3f48-151b-4d9a-9df6-cc8479efa839 payload: {"instance"=>"", "index"=>0, "reason"=>"CRASHED", "exit_description"=>"2 error(s) occurred:\n\n* 2 error(s) occurred:\n\n* Exited with status 1\n* cancelled\n* cancelled", "crash_count"=>1, "crash_timestamp"=>1513012904337368910, "version"=>"f75e2238-95dd-45ed-9d7f-66c6c3ef4d7f"}
Now it seems we're getting somewhere: a NoClassDefFoundError
for org/slf4j/LoggerFactory
. This means that at least we managed to start a Java process, whoopdeedoo! So now we have to find the missing classes by adding them to the classpath somehow. This is where it all started to get complicated. There is no way I could find to add additional jar files to the classpath in the chosen setup. In fact, this setup has a serious flaw. The documentation for cf push
on 'how it finds the application' states: if the path is to a file, cf push pushes only that file. So this is never going to work because we need a whole bunch of other files.
So, what's next? Luckily, a colleague of mine who knows his way around CloudFoundry, found this blog post. The idea is to specify a number of settings to trick the buildpack into doing what we want (repeating some stuff from the aforementioned post in my own words):
JBP_CONFIG_JAVA_MAIN
environment variable as before../
. Since we use the java-main container we do not really have a compile phase but we still need all microservice files.manifest.yml
file.Given these requirements, we come up with the following manifest file:
---
applications:
- name: discovery_service
path: ./
buildpack: java_buildpack_offline
command: $PWD/.java-buildpack/open_jdk_jre/bin/java -cp $PWD/*:.:$PWD/lib/*:$PWD/config/* com.sdl.delivery.service.ServiceContainer -Xrs -Xms128m -Xmx128m
env:
JBP_CONFIG_JAVA_MAIN: '{ java_main_class: "com.sdl.delivery.service.ServiceContainer", arguments: "-Xrs -Xms128m -Xmx128m" }'
JBP_LOG_LEVEL: DEBUG
And if we push the app this time, it works!!
App discovery_service was started using this command `$PWD/.java-buildpack/open_jdk_jre/bin/java -cp $PWD/*:.:$PWD/lib/*:$PWD/config/* com.sdl.delivery.service.ServiceContainer -Xrs -Xms128m -Xmx128m`
Showing health and status for app discovery_service in org PCF / space Test as admin...
OK
requested state: started
instances: 1/1
usage: 1G x 1 instances
urls: discovery-service.test-cf-prod.intranet
last uploaded: Tue Dec 12 15:05:32 UTC 2017
stack: cflinuxfs2
buildpack: java_buildpack_offline
state since cpu memory disk details
#0 running 2017-12-12 04:06:04 PM 0.0% 0 of 1G 0 of 1G
You see that our new command is used, making everything we want available on the classpath. You may wonder, how did we know that the location of the java executable was $PWD/.java-buildpack/open_jdk_jre/bin/java
(besides from the blog post I referred to earlier). This is where the JBP_LOG_LEVEL
environment variable comes in. It is a variable specific to the Java buildpack that tells it to generate debug output. Part of the output is the exact command the buildpack will execute (if you do not specify your own command).
I was asked to develop a smoke test to ensure a certain level of confidence in the Single-Sign-On (SSO) capabilities of the platform. SSO in CloudFoundry is taken care of by CloudFoundry User Account and Authentication (UAA) Server, an open-source, multi-tenant, OAuth2 identity management service. Not knowing a lot about UAA and knowing that it is open-source, I decided that my first step should be to try and install UAA on my laptop and get it up-and-running, ideally inside a debugger so that I could step through authorization and token requests. This blog post explains how to do that, how to configure a local UAA database and how to interact with UAA once installed.
Some additional details before getting started:
Following the UAA documentation you can see that installing UAA locally is really easy. Just perform the following steps:
$ git clone git://github.com/cloudfoundry/uaa.git
$ cd uaa
$ ./gradlew run
However, that is not exactly what I did... I'd like to use IntelliJ to set breakpoints and step through code and IntelliJ is installed on my Windows box. So what I actually did was clone the UAA repo on my Windows box to the folder %HOMEPATH%\IdeaProjects\uaa
(in my case: C:\Users\rwwil\IdeaProjects\uaa
). You can now open the project inside IntelliJ and browse through all the code.
Next, inside Ubuntu, you need to locate the folder you cloned UAA into. In my case this is /mnt/c/Users/rwwil/IdeaProjects/uaa
. From that folder you can execute ./gradlew run
and all should be well: you should now have a local UAA running on the default Tomcat port 8080.
Of course it's very nice to have it all up-and-running but in my opinion it helps tremendously to be able to step through code to see what is going on and understand what happens. So we want to attach IntelliJ as debugger to the running UAA instance. First, this requires some configuration inside IntelliJ: you need to create a remote debugging configuration. This option is available from the Run → Edit Configurations... menu. In my case it looks like this:
Note the command-line arguments that must be added to the remote JVM:
-agentlib:jdwp=transport=dt_socket,server=y,suspend=n,address=5005
Unfortunately, we started UAA via Gradle and to be honest I have no idea how to add additional command-line options to the Java process that is started by Gradle. So what we need is the complete command line of the running Java process. This is quite easy on Linux:
$ ps -ef | less
We get all running processes (-e
) with their full command line (-f
). The output should look as follows:
UID PID PPID C STIME TTY TIME CMD
root 1 0 0 Nov20 ? 00:00:00 /init
rwwilden 2 1 0 Nov20 tty1 00:00:00 -bash
rwwilden 82 1 0 Nov20 tty2 00:00:00 -bash
rwwilden 179 1 0 Nov21 tty3 00:00:04 -bash
rwwilden 299 2 0 Nov24 tty1 00:06:19 /usr/lib/jvm/java-8-openjdk-amd64/jre/bin/java -agentlib:jdwp=transport=dt_socket,server=y,suspend=n,address=5005 -javaagent:/tmp/cargo/jacocoagent.jar=output=file,dumponexit=true,append=false,destfile=/mnt/c/Users/rwwil/IdeaProjects/uaa/build/integrationTestCoverageReport.exec -DLOGIN_CONFIG_URL=file:///mnt/c/Users/rwwil/IdeaProjects/uaa/./uaa/src/main/resources/required_configuration.yml -Xms128m -Xmx512m -Dsmtp.host=localhost -Dsmtp.port=2525 -Dspring.profiles.active=default,sqlserver -Dcatalina.home=/mnt/c/Users/rwwil/IdeaProjects/uaa/build/extract/tomcat-8.5.16/apache-tomcat-8.5.16 -Dcatalina.base=/tmp/cargo/conf -Djava.io.tmpdir=/tmp/cargo/conf/temp -Djava.util.logging.manager=org.apache.juli.ClassLoaderLogManager -Djava.util.logging.config.file=/tmp/cargo/conf/conf/logging.properties -classpath /mnt/c/Users/rwwil/IdeaProjects/uaa/build/extract/tomcat-8.5.16/apache-tomcat-8.5.16/bin/tomcat-juli.jar:/mnt/c/Users/rwwil/IdeaProjects/uaa/build/extract/tomcat-8.5.16/apache-tomcat-8.5.16/bin/bootstrap.jar:/usr/lib/jvm/java-8-openjdk-amd64/lib/tools.jar org.apache.catalina.startup.Bootstrap start
rwwilden 772 1 0 Nov28 tty4 00:00:04 -bash
You get a very long Java command line that you can copy and modify as needed. In our case, we'd like to add debugging options (which I already added in the example output above).
Now paste the modified command line and run it and we have a Java process that IntelliJ can attach to.
By default, UAA runs with an in-memory database, losing all data between restarts. My laptop runs Microsoft SQL Server which UAA actually supports so let's check out how to configure this.
The way UAA selects between data stores is via Spring Profiles. We can add a profile to the command-line we just copied. Just add sqlserver
to the spring.profiles.active
command-line parameter: -Dspring.profiles.active=default,sqlserver
.
Next step is the connection string for SQL Server. This can be configured in uaa/server/src/main/resources/spring/env.xml
. For my local setup I use the following:
<beans profile="sqlserver">
<description>Profile for SQL Server scripts on an existing database</description>
<util:properties id="platformProperties">
<prop key="database.driverClassName">com.microsoft.sqlserver.jdbc.SQLServerDriver</prop>
<prop key="database.url">jdbc:sqlserver://localhost:1433;database=uaa;</prop>
<prop key="database.username">root</prop>
<prop key="database.password">changemeCHANGEME1234!</prop>
</util:properties>
<bean id="platform" class="java.lang.String">
<constructor-arg value="sqlserver" />
</bean>
<bean id="validationQuery" class="java.lang.String">
<constructor-arg value="select 1" />
</bean>
<bean id="limitSqlAdapter" class="org.cloudfoundry.identity.uaa.resources.jdbc.SQLServerLimitSqlAdapter"/>
</beans>
So I have a local database named uaa
and a user named root
. Now we have a setup where we can actually see what UAA is writing to the database when certain actions are performed.
Ok, final step: what can we do with UAA once we have it up-and-running? It is an OAuth2 server so let's see if we can get a token somehow. The easiest way to communicate with UAA is through the UAA CLI (UAAC). This is a Ruby application so you need to install Ruby to get it working (there is some work underway on a Golang version of the CLI).
First we have to point UAAC to the correct UAA instance:
uaac target http://localhost:8080/uaa
Next, we'd like to perform some operations on UAA so for that we need an access token that allows these operations. UAA comes pre-installed with an admin
client application that you can get a token for:
uaac token client get admin -s "adminsecret"
If we dissect this line:
uaac token
: perform some token operation on UAAclient
: use the OAuth2 client credentials grantget
: get a tokenadmin -s "adminsecret"
: get a token for the application with client_id
=admin
and client_secret
=adminsecret
The output should be:
Successfully fetched token via client credentials grant.
Target: http://localhost:8080/uaa
Context: admin, from client admin
The obtained token is stored (in my case) in /home/rwwilden/.uaac.yml
.
Using this token we can now perform some administration tasks on our local UAA. Some examples:
Add a local user:
uaac user add smokeuser --given_name smokeuser --family_name smokeuser --emails smokeuser2@mail.com --password smokepassword
Add a local group (or scope in OAuth2 terminology):
uaac group add "smoke.extinguish"
Add user to scope:
uaac member add smoke.extinguish smokeuser
Add a client application that requires the smoke.extinguish
scope and allows logging in via the OAuth2 resource owner password credentials grant:
uaac client add smoke --name smoke --scope "smoke.extinguish" --authorized_grant_types "password" -s "smokesecret"
Obtain a token for user smokeuser
on client application smoke
using the password credentials grant:
uaac token owner get smoke smokeuser -s smokesecret -p smokepassword
Of course, there is a lot more to know about CloudFoundry UAA. As I mentioned earlier, it is a full-fledged OAuth2 implementation that has proven itself in numerous (Pivotal) CloudFoundry production installations. Here are some additional references:
A quick recap of Kaggle and the data set we're analyzing: Horses For Courses. Kaggle is a data science and machine learning community that hosts a number of data sets and machine learning competitions, some of which with prize money. 'Horses For Courses' is a (relatively small) data set of anonymized horse racing data.
In the first post I discussed how you could use Azure Data Lake Analytics and U-SQL to analyze and process the data. I used this mainly to generate new data files that can then be used for further analysis. In the second and third post I studied the effects of barrier and age on a horse's chances of winning a race.
In this post I'm going to study the relation between the last five starts that is known before a horse starts a race and its chances of winning the race. For every horse in a race we know the results of its previous five races from the runners.csv
file in the Kaggle dataset. At first sight, this seems a promising heuristic for determining how a horse will perform in the current race so let's see if that's actually the case.
The analysis itself will again be performed using Azure Notebooks with an F# kernel. Here's the link to my notebook library.
A typical last five starts might look like this: 3x0f2
. So what does this mean? A short explanation:
1
to 9
: horse finished in position 1 to 90
: horse finished outside the top 9f
: horse failed to finishx
: horse was scratched from the raceSo in 3x0f2
a particular horse finished third, was scratched, finished outside the top 9, failed to finish and finished second in its previous five races.
You may already spot a problem here. When we get a 1
to 9
, we know what happened in a previous race. When we get a 0
, we have some information but we don't know exactly what happened. For an f
or an x
we know nothing. In both cases, if the horse had run, it might have finished at any position.
To be able to compare the last five starts of two horses, we have to fix this. Especially, if we want to use this data as input to a machine learning algorithm, we should fix this1.
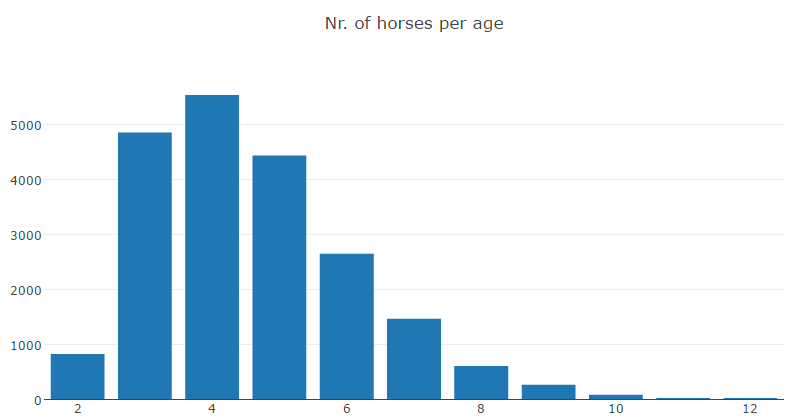
When we do some more digging in the dataset, it appears that we do not have a complete last five starts for every horse. For some horses, we only have the last four starts or the last two. And for some horses we have nothing at all. Let's take a look at the distribution of the length of last five starts in our dataset:
(5: 72837) (4: 3379) (3: 3461) (2: 3553) (0: 5054)
I've written it a down a bit terse but you can see that for 72837 (or 83% of) horses we know the last five starts. But still, it's hard to compare 32xf6
with 4f
so we should fix the missing data as well.
The accompanying Azure Notebook describes all fixes in detail, so I'll give a summary here:
x
and f
: In both cases, a horse could have finished the race but didn't2. What we do here is replace each x
and f
with the average finishing position of a horse over all races as a best guess (we can simply take the average over all races of the number of horses in a race).0
: The horse finished outside the top 9 so we replace each 0
with the average finishing position for horses outside the top 9 (and here we take the average over all races with more than 9 horses).One small example of what's happening: suppose we have 4xf0
. With our current algorithm, this will be represented as (4.00, 6.49, 6.49, 11.66, 6.49)
as follows:
4 | → | 4.00 | A 4 will remain a 4. |
x | → | 6.49 | An x will be replaced by 6.49 , the average finishing position over all races. |
f | → | 6.49 | An f will be replaced by 6.49 , the average finishing position over all races. |
0 | → | 11.66 | A 0 will be replaced by 11.66 , the average finishing position for horses that finish outside the top 9. |
missing data | → | 6.49 | Missing data will be replaced by 6.49 , the average finishing position over all races. |
Now that we can be sure that every last five starts has the same length, how do we compare them? The easiest way in my opinion is to take the average. So with our previous example we get:
4xf0
→ (4.0, 6.5, 6.5, 11.7, 6.5)
→ 7.04
And we can do this for every horse. So now we have one number for every horse in a race that describes the last five starts, how convenient :) 3
With fixing and averaging in place, we will use switch back to U-SQL to prepare our dataset. Remember from the first post that we want pairs for all horses in a race so that we can reduce our ranking problem (in what order do all horses finish) to a binary classification problem (does horse a finish before or after horse b).
I'll digress a bit into Azure Data Lake and U-SQL so if you just want to know how last five starts relates to finishing position you can skip this part. I'm assuming you already know how to create tables with U-SQL so I'll skip to the part where I create the data file we will use for analysis.
First of all, we need the average finishing position over all races so we can fix x
, f
and missing data:
@avgNrHorses =
SELECT (((double) COUNT(r.HorseId)) + 1d) / 2d AS AvgNrHorses
FROM master.dbo.Runners AS r
GROUP BY r.MarketId;
@avgPosition =
SELECT AVG(AvgNrHorses) AS AvgPosition
FROM @avgNrHorses;
We get the average number of horses in each race and than calculate the average over that. Second, we need the average finishing position of horses outside the top 9:
@avgNrHorsesAbove9 =
SELECT
(((double) COUNT(r.HorseId)) - 10d) / 2d AS AvgNrHorses,
COUNT(r.HorseId) AS NrHorses
FROM master.dbo.Runners AS r
GROUP BY r.MarketId;
@avgPositionAbove9 =
SELECT AVG(AvgNrHorses) + 10d AS AvgPosition
FROM @avgNrHorsesAbove9
WHERE NrHorses > 9;
A little more complex but essentially the same as the previous query but with just the races that have more than 9 horses.
The final part is where we generate the data we need and output it to a CSV file:
@last5Starts =
SELECT
HorsesForCourses.Udfs.AverageLastFiveStarts(
r0.LastFiveStarts, avg.AvgPosition, avg9.AvgPosition) AS LastFiveStarts0,
HorsesForCourses.Udfs.AverageLastFiveStarts(
r1.LastFiveStarts, avg.AvgPosition, avg9.AvgPosition) AS LastFiveStarts1,
p.Won
FROM master.dbo.Pairings AS p
JOIN master.dbo.Runners AS r0
ON p.HorseId0 == r0.HorseId AND p.MarketId == r0.MarketId
JOIN master.dbo.Runners AS r1
ON p.HorseId1 == r1.HorseId AND p.MarketId == r1.MarketId
CROSS JOIN @avgPosition AS avg
CROSS JOIN @avgPositionAbove9 AS avg9;
OUTPUT @last5Starts
TO "wasb://output@rwwildenml.blob.core.windows.net/last5starts.csv"
USING Outputters.Csv();
There are two interesting parts in this query: the AverageLastFiveStarts
function call and the CROSS JOIN
. First the CROSS JOIN
: both @avgPosition
and @avgPositionAbove9
are tables with just one row. A cross join returns the cartesian product of the rowsets in a join so when we join with a rowset that has just one row, this row's data is simply appended to each row in the first rowset in the join.
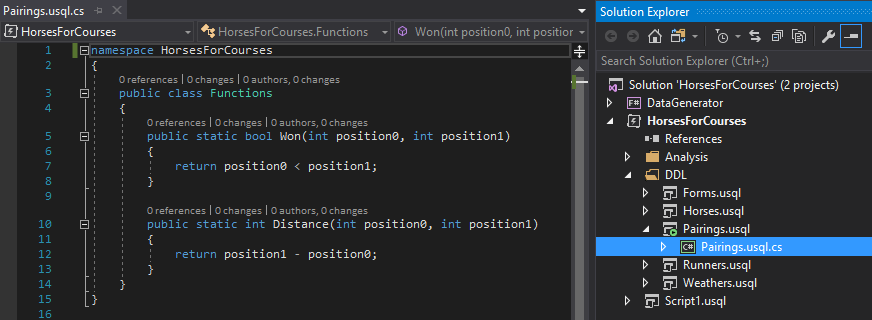
The AverageLastFiveStarts
user-defined function takes a last five starts string, fixes it in the way we described earlier and returns the average value:
namespace HorsesForCourses
{
public class Udfs
{
public static double AverageLastFiveStarts(string lastFiveStarts,
double? avgPosition,
double? avgPositionAbove9)
{
// Make sure the string has a length of 5.
var paddedLastFiveStarts = lastFiveStarts.PadLeft(5, 'x');
var vector = paddedLastFiveStarts
.Select(c =>
{
switch (c)
{
case 'x':
case 'f':
return avgPosition.Value;
case '0':
return avgPositionAbove9.Value;
case '1': case '2': case '3': case '4': case '5':
case '6': case '7': case '8': case '9':
return ((double) c) - 48;
default:
throw new ArgumentOutOfRangeException(
"lastFiveStarts", lastFiveStarts, "Invalid character in last five starts");
}
});
return vector.Average();
}
}
}
The code is also up on Github so you can check the details there.
We now have a data file that has, on each row, the last five starts average for two horses and which of the two won in a particular race. Some example rows:
3.90, 6.49, True
4.30, 6.49, False
6.70, 3.50, False
6.70, 5.40, False
7.63, 4.40, False
6.69, 5.49, True
On the first row, a horse with an average last five starts of 3.90
beat a horse with an average last five starts of 6.5
. On the second row, 4.3
got beaten by 6.5
, on the third row, 6.7
got beaten by 3.5
, etc.
So how do we get a feeling for the relation between last five starts and the chances of beating another horse. I decided to do the following:
In the example rows above, the largest difference is in row 5: 3.23
. Since differences can be both positive and negative, we have a range of length 3.23 + 3.23 = 6.46
to divide into buckets. Suppose we decide on two buckets: [-3.23, 0)
and [0, 3.23]
. Now get each difference into the right bucket:
diff bucket
3.90, 6.49, True, -2.59 --> bucket 1
4.30, 6.49, False, -2.19 --> bucket 1
6.70, 3.50, False, 3.19 --> bucket 2
6.70, 5.40, False, 1.29 --> bucket 2
7.63, 4.40, False, 3.23 --> bucket 2
6.69, 5.49, True, 1.20 --> bucket 2
So we have 2 horses in bucket 1 and 4 horses in bucket 2. The win/loss ratio in bucket 1 is 1 / 1 = 1
, the win loss ration in bucket 2 is 1 / 4 = 0.25
. So if the difference in last five starts is between -3.23
and 0
, the win/loss ratio is 1.0
. If the difference is between 0
and 3.23
, the win/loss ratio is 0.25
.
This is of course a contrived example. In reality we have almost 600000 rows so we will get some more reliable data. I experimented a little with bucket size and 41 turned out to be a good number. This resulted in the following plot. I skipped the outer three buckets on both sides because there aren't enough data points in there.
The bars represent the buckets, the line represents the number of data points in each bucket. I highlighted bucket 24 as an example. This bucket represents the differences between average last five starts of two horses between 1.59
and 2.05
. This bucket has 34777 rows and the win/loss ratio is 1.54
.
This means that if the difference between average last five starts of two horses is between 1.59
and 2.05
, the horse with the higher average is 1.54
times more likely to beat the other horse! This is pretty significant. If we take two random horses in a race, look at what they did in their previous five races and they happen to fall into this bucket, we can predict that one horse is 1.54
times more likely to win.
We need to put these numbers a little bit into perspective, because it matters how many records of the total population fall into bucket 24. This is about 5.83%
. However, the data set is symmetric in the sense that it includes two rows for each horse pair (so if we have a,b,True
we also have b,a,False
). So bucket 16 is the inverse of bucket 24 with the same number of records: 34777. This means we can actually tell for 11.66%
of the total population that one horse is 1.54
times more likely to win than another horse.
So far, we have analyzed three features for their effect on horse race outcomes: barrier, age and last five starts. Barrier and age had a clear effect and now we found that average last five starts also has an effect. Each one of these separately cannot be used to predict horse races but maybe combined they present a better picture.
Age and barrier are independent of each other. The barrier you start from is the result of a random draw and it has no effect on the age of a horse. Vice versa, the age of a horse has no effect on the barrier draw. We already established that both age and barrier have an effect on race outcomes so you might be inclined to think that both also have an effect on the last five starts. This is not true for barrier but it may be true for age. We determined in the previous post that younger horses outperform older horses. It makes sense then that the last five starts of younger horses is better than that of older horses.
Ideally we would like to present a machine learning algorithm a set of independent variables. Using both age and last five starts may not be a good idea.
In the next post we'll get our hands dirty with Azure Machine Learning to see if we can get 'better than random results' when we present the features we analyzed to a machine learning algorithm. Stay tuned!
x
, f
and 0
as they are and have the algorithm figure out what they mean. However, think about what this would mean. Suppose we have two horses: 067xf
and 9822x
and the first won. The input for our machine learning algorithm would be: 0,6,7,x,f,9,8,2,2,x,True
. That's 10 feature dimensions, just to describe the last five starts! High-dimensional sample spaces are a problem for most machine learning algorithms and this is usually referred to as the curse of dimensionality, very nicely visualized in these two two Georgia Tech videos. So the less dimensions, the better.x
) and failing to finish (f
) are two different things. Especially an f
could give us more information about future races. Suppose we see the following last five starts: 638ff
. The horse failed to finished in its last two races. This doesn't give much confidence about the current race. On the other hand, f8f63
tells a different story but has the same results, just in a different order. Maybe in a future blog post I'll dig deeper into better methods for handling x
and f
.97531
is better that 13579
. The first shows a clear positive, the second a clear negative trend. However, deriving a trend from a series of five events seems a bit ambitious so I decided against it.A quick recap of Kaggle and the data set we're analyzing: Horses For Courses. Kaggle is a data science and machine learning community that hosts a number of data sets and machine learning competitions, some of which with prize money. 'Horses For Courses' is a (relatively small) data set of anonymized horse racing data.
In the first post I discussed how you could use Azure Data Lake Analytics and U-SQL to analyze and process the data. I used this mainly to generate new data files that can then be used for further analysis. In the second post I studied the effect of the barrier a horse starts from on its chances of winning a race.
In this post I'm going to do the same but now for age: how does the age of a horse affect its chances of winning a race. The analysis will again be based on a file that was generated from the raw data using a U-SQL script in Azure Data Lake. The file has a very simple format: column 1 has the age of the first horse, column 2 of the second horse and column 3 tells us who won in a particular race. So for example:
3,7,True
10,4,False
The first row tells us that in a particular race, a 3-year-old horse beat a 7-year-old horse. The second row tells us a 10-year-old horse got beaten by a 4-year-old.
The analysis will again be performed using an Azure Notebook with an F# kernel. Here is the link to my notebook library.
As in the previous post, the details can be found in the accompanying Azure Notebook. You can clone the notebook library using a Microsoft account. Remember that Shift+Enter is the most important key combination; it executes the current cell and moves to the next cell.
The first thing we'd like to know is how many horses there are for a particular age. This information can be found in the raw data from Kaggle: horses.csv
. If we plot the results we get the following:
You can see that for ages 3, 4, 5, 6 and maybe 7 we have a reasonable amount of data.
The next step is analyzing the ages.csv
file we generated that has one row for each age combination in each race. For this we apply a similar tactic as we used in the previous post: check for each age how many times a horse from that age beat horses from other ages. This results in the following matrix:
Some examples to clarify what we see here:
The absolute numbers in this matrix do not tell us a lot, since they are skewed by the number of horses of a particular age that actually ran races. So what we do next is divide the number of wins by the number of losses per age pair: the win-loss ratio. These are the numbers for ages 2 to 7:
The second value in the first row is obtained by dividing 793 by 1424. The first value in the second row is its inverse: 1424 divided by 793. Now let's visualize the data. I started out with a 3D surface plot (as in the previous post) but that got a bit convoluted so I used simple line charts instead:
In the plot I compared ages 2 to 8. I highlighted the results of 2, 3 and 4 year old horses against other 4-year-olds. So, for example, you can see that a 2-year-old horse has a win/loss ratio of 0.701087
against 4-year-old horses. What is obvious is that younger horses outperform older horses (except for 2-year-old horses): 3-year-old horses have a positive win/loss ratio against any other age.
However, if we take the positive win/loss ratio of 1.078054
of 3-year-olds against 4-year-olds, it doesn't really help us predict horse races. If we revisit the absolute numbers, we can see that 3-year-olds beat 4-year-olds 11588 times, but 4-year-olds beat 3-year-olds 10749 times.
But still, the effect of age is obvious so there must be some way to use it in predicting race outcomes. Maybe instead of age we could use the win/loss ratio directly. However, we may loose information if we reduce ages 2 and 4 in each race to the number 0.701087
. Maybe age combined with another feature is a strong predictor for race outcomes. For example, maybe 2-year-old horses perform very well on muddy race tracks. By reducing age pairs to just a win/loss ratio this information may be lost.
So even if age is a factor to consider, I doubt whether it is actually useful as direct input for a machine learning algorithm.
]]>A quick recap of Kaggle and the data set we're analyzing: Horses For Courses. Kaggle is a data science and machine learning community that hosts a number of data sets and machine learning competitions, some of which with prize money. 'Horses For Courses' is a (relatively small) data set of anonymized horse racing data. In the previous post I discussed how you could use Azure Data Lake Analytics and U-SQL to analyze and process the data. I used this mainly to generate new data files that can then be used for further analysis.
The first file I created, based on the source data, was a file called barriers.csv
. It contains, for each race, the starting barrier for each pair of two horses in the race and which horse finished before the other horse. I am now going to analyze this file using Azure Notebooks with an F# kernel.
You may now wonder, what is he talking about?! So hang on and let me explain. An Azure Notebook is a way of sharing and running code on the internet. A number of programming languages are supported like Python, R and F#. A programming language in a notebook is supported via a kernel and in my case I use the F# kernel.
Azure Notebooks isn't exactly new technology because it's an implementation of Jupyter Notebooks. Jupyter evolved as a way to do rapid online interactive data analysis and visualization, which is exactly what I'm going to do with my barriers.csv
file.
The largest part of this post is actually inside the notebook itself, so let me give you the link to my notebook library. At the time of writing there is one notebook there: Barriers.ipynb
. You can run this notebook by clicking on it and logging in with a Microsoft account (formerly known as Live account).
When you do that, the library is cloned (don't worry, it's free) and you can run the notebook. The most important thing to remember if you want to run an Azure (or Jupyter) notebook is the key combination Shift+Enter. It executes the current notebook cell and moves to the next cell.
I invite you to run the notebook now to see what the data looks like and how it is analyzed. It takes about five minutes. But if you do not have time or do not feel like cloning and running an Azure notebook, I will provide the summary here.
We have a data set of about half a million rows with two barriers and a flag indicating who won on each row. These are grouped together to determine for every barrier, how often starting from that barrier resulted in a win. The final result of this step is shown below (for 13 barriers):
On the first row, we see that barrier 1 beats barrier 2 3212 times. It beats barrier 3 3144 times, etc. You can immediately spot a problem with this data. We would expect that starting from a lower barrier gives you an advantage. However, for example, barrier 1 beats barrier 12 only 981 times. Reason for this is that there are less horse races with 12 horses than there are with 6 horses, for example.
We need the relative instead of the absolute numbers: the win-loss ratio per barrier combination. So we divide the number of times barrier x
beats barrier y
by the number of times barrier y
beats barrier x
. The result is below (for 6 barriers this time so everything fits nicely on a row).
You can see that barrier 1 gives positive win-loss ratios against all other barriers. To make this even more clear, let's visualize the data (for the first 14 barriers).
I hope I found the right angle that makes the visualization the easiest to understand. In the notebook it is interactive so you can turn it around and zoom in. The diagonal line represents barriers racing against themselves so this is always 1. Behind this diagonal the graph rises up, indicating positive win-loss ratios. The graph comes down in front of the diagonal, indicating negative win-loss ratios.
The y-axis represents the first barrier, the x-axis the second barrier. So if you take a look at y = 0
(barrier 1), you can see it has a positive win-loss ratio against all other barriers (all x
values). If you look at y=6
(barrier 7), it has a negative win-loss ratio against x = 0..5
(barriers 1 through 6) and a positive win-loss ratio against x = 7..13
(barriers 8 through 14).
The same is true for almost all barriers, indicating that it's better to start from a lower barrier: it definitely increases your chances of winning the race.
However, it is definitely not the only feature we need to predict finishing positions in a race. Even though barrier 4 beats barrier 8 2739 times, barrier 8 also beats barrier 4 2421 times. We need to find additional features in the data set if we want to make accurate predictions. That's a topic for a future post.
]]>Kaggle is a data science community that hosts numerous data sets and data science competitions. One of these data sets is 'Horses For Courses'. It's a (relatively) small set of anonymized horse racing data. It tells you which horses participated in a race, how old they were, from what barrier they started, what the weather was like at the time of the race, betting odds and a lot more. The official goal is to predict the finishing position of a horse in a race. The real goal is of course to beat the odds and win a lot of money betting on horse races via a machine learning model :)
The data set, unzipped, is a little over 100MB, nothing you can't handle on a laptop. But since data sets aren't usually this small, I was looking for a cloud solution that allows analysis of large data sets, just to get some experience with that.
As it happens, Azure Data Lake provides storage for (really) large data sets and Azure Data Lake Analytics provides analytics capabilities through a SQL-dialect called U-SQL. Data Lake Store is built on top of Apache Hadoop YARN and Data Lake Analytics uses MapReduce-style execution of workloads. It's a pay-as-you-go model so if you don't run large jobs or store a lot of data, it costs you next to nothing.
The data set can be downloaded as a zip file from Kaggle. I unzipped the file and uploaded the contents to an Azure Blob Storage container:
Why Azure Blob Storage and not Azure Data Lake itself? Well, I'd like to do some data analysis using Azure Notebooks with F# and blob storage provides easy access to blobs without authentication (haven't found that for Data Lake yet).
Now that we have the csv files in place, we first create Azure Data Lake tables from these files. This isn't strictly necessary because Data Lake uses so-called schema-on-read so we could just extract data from the csv files and analyze this directly. However, when you need to extract data multiple times from the same set of csv files, table definitions are really helpful.
Our first target for analysis is runners.csv
. It has a row for every horse in every race and includes finishing position (the field we want to predict with our money-making ML model). BTW: all source code in this post and the ones that follow is also available on Github. Let's create a table for the runners.csv
file:
CREATE TYPE IF NOT EXISTS RunnersType
AS TABLE (Id int, Collected DateTime, MarketId int, Position int?, ...,
HorseId int, ..., Barrier int, ...);
DROP TABLE IF EXISTS Runners;
DROP FUNCTION IF EXISTS RunnersTVF;
CREATE FUNCTION RunnersTVF()
RETURNS @runners RunnersType
AS
BEGIN
@runners =
EXTRACT Id int,
Collected DateTime,
MarketId int,
Position int?,
...,
HorseId int,
...,
Barrier int,
...
FROM "wasb://raw@rwwildenml.blob.core.windows.net/runners.csv"
USING Extractors.Csv(skipFirstNRows : 1);
END;
CREATE TABLE Runners
(
INDEX RunnersIdx CLUSTERED(Id ASC)
DISTRIBUTED BY HASH(HorseId)
)
AS RunnersTVF();
A lot of things happen here. Let's get into the details one by one:
EXTRACT
statement. It's a little more work like this but I like that you explicitly define a table type.EXTRACT
statement reads a CSV file from a blob storage account via the url: wasb://raw@rwwildenml.blob.core.windows.net/runners.csv
where:wasb
stands for Windows Azure Storage Blob,raw
is the name of the blob storage container where the files live,rwwildenml.blob.core.windows.net
is the name of my storage account andrunners.csv
is the name of the file....
s, the actual file has 40 columns.When we run the above script an actual table is created and stored inside Azure Data Lake. You can join this table to other tables, you can group, you can use aggregates, etc. And while I have a very small table, the same principles apply to giga- or tera-byte tables. In that case you would have to give some more careful consideration to partitioning.
A next logical question would be: how do I run this script? The two easiest ways are: directly from the Azure portal or from within Visual Studio. I used the latter and installed Visual Studio 2017. A simple File → New Project gives you the option to create a new U-SQL Project1.
Of course, you also need an Azure Data Lake Store and Azure Data Lake Analytics resource in Azure. Both can simply be created from the Azure Portal.
From within Visual Studio, you can actually connect to your Data Lake Analytics resource(s) in Azure using Server Explorer:
I highlighted the resources we created with the script above and the linked blob storage account (rwwildenml
).
With all the plumbing out of the way, we can start analyzing the data. Remember, our goal is to predict finishing positions of horses in a race. This is essentially a ranking problem. Suppose we have four horses in a race: A
, B
, C
and D
and let's assume they finish in alphabetical order. We can then generate pairs for each horse combination and label them as follows:
1. A B won
2. A C won
3. A D won
4. B A lost
5. B C won
6. B D won
7. C A lost
8. C B lost
9. C D won
10. D A lost
11. D B lost
12. D C lost
On row 1, horse A
finished before horse B
so we label this as won
. On row 8, horse C
finished after horse B
so this is labeled lost
. We can do this for every horse race in the runners.csv
file.
The following U-SQL script creates a table called Pairings
that contains each pair of horses per race, whether the first horse in the pair won and what the distance was between finishing positions.
DROP TABLE IF EXISTS Pairings;
CREATE TABLE Pairings
(
INDEX PairingsIdx CLUSTERED(HorseId0 ASC, HorseId1 ASC)
PARTITIONED BY HASH (HorseId0, HorseId1)
)
AS
SELECT
r0.MarketId,
r0.HorseId AS HorseId0,
r1.HorseId AS HorseId1,
HorsesForCourses.Functions.Won(
r0.Position.Value, r1.Position.Value) AS Won,
HorsesForCourses.Functions.Distance(
r0.Position.Value, r1.Position.Value) AS Distance
FROM master.dbo.Runners AS r0
JOIN master.dbo.Runners AS r1 ON r0.MarketId == r1.MarketId
WHERE r0.HorseId != r1.HorseId
AND r0.Position.HasValue
AND r1.Position.HasValue;
We simply join the Runners
table against itself where both race ids (market ids) are equal. Horses are not compared against themselves and both positions must have a value.
You may wonder, what are HorsesForCourses.Functions.Won
and HorsesForCourses.Functions.Distance
? Well, you can actually use C# user defined functions (and lots more) from U-SQL. Won
and Distance
are two very simple functions that return a bool
and an int
, respectively.
When we run this script, we get a table with the following columns:
MarketId
: the id of the race the horses participated inHorseId0
: a horse in the raceHorseId1
: another horse in the same raceWon
: whether the first horse (HorseId0
) won or lostDistance
: the difference between horse positionsUsing the Pairings
table we just created, we can derive other data. The first data set we're going to create has the following columns:
Barrier0
: what was the starting barrier for the first horseBarrier1
: what was the starting barrier for the second horseWon
: which horse wonWhen we have this set, we can try and determine if barrier has an effect on a horse's chances of winning a race. The analysis of this data set is the topic of the next post so we'll finish here with a script that generates the CSV file in blob storage:
@barriers =
SELECT r0.Barrier AS Barrier0,
r1.Barrier AS Barrier1,
p.Won
FROM master.dbo.Pairings AS p
JOIN master.dbo.Runners AS r0 ON p.HorseId0 == r0.HorseId AND
p.MarketId == r0.MarketId
JOIN master.dbo.Runners AS r1 ON p.HorseId1 == r1.HorseId AND
p.MarketId == r1.MarketId;
OUTPUT @barriers
TO "wasb://output@rwwildenml.blob.core.windows.net/barriers.csv"
USING Outputters.Csv();
First we generate a new data set called @barriers
by joining our Pairings
table twice to Runners
(for horse 0 and horse 1). Next we output this data set to a CSV file in blob storage. We now have a file that contains, for every race, the barriers for each horse pair in each race and whether this resulted in a win or a los. If we take one row, for example:
3,7,True
This indicates that in a particular race, the horse starting from barrier 3 has beaten the horse starting from barrier 7.
One final screenshot from Visual Studio may be interesting and that is the job graph that describes what happened when we ran the last script:
As you can see, there were two inputs: master.dbo.Runners
and master.dbo.Pairings
. Each block represents an operation on data. The final block generates the barriers.csv
file with 596546 rows.
At the moment of writing this post there is no built-in support for client certificate authentication in Service Fabric that I could find. So although everything described below actually works, it won't win any beauty contests :)
Let's begin: first of all, client certificate authentication won't work without server authentication. So before you continue, make sure the Service Fabric API endpoint is protected by a server authentication certificate (check this post for details).
On Windows, a server authentication certificate is bound to one or more specific TCP ports. When a client (a browser for example) sends an http request to this port, the server responds with the configured certificate (among other things). This is of course a gross oversimplification but it serves our purpose.
You can check which certificates are bound to which ports using the netsh
command: netsh http show sslcert
.
In the screenshot you can see that on my local machine, the certificate with thumbprint 6ffb99586b7580f67e8e6bb65a19067c62fb872b
is bound to ports 44389 and 44399. If you look more closely at the output, you see that there is a property Negotiate Client Certificate
for each port binding. If we can set this property to Enabled
for the right port binding, we're done.
If we take the binding for port 44399 as example, the following two statements accomplish that (line breaks are just for readability, each statement should be on a single line):
netsh http delete sslcert ipport=0.0.0.0:44399
netsh http add sslcert ipport=0.0.0.0:44399 `
certhash=6ffb99586b7580f67e8e6bb65a19067c62fb872b `
appid="{214124cd-d05b-4309-9af9-9caa44b2b74a}" `
clientcertnegotiation=enable
If we take a look at the output now it looks like this (showing just port 44399):
That was easy! The real problem is: how to do the same on the virtual machines in an Azure Service Fabric cluster?
To make this work, we can use a feature of Service Fabric called a setup entry point. Besides the long running process that each micro service actually is, you can have special setup tasks that run each time a service is started on a cluster node. We will use a setup entry point to enable client certificate negotiation. In my configuration (ServiceManifest.xml
) this looks as follows:
<CodePackage Name="Code" Version="1.0.0">
<SetupEntryPoint>
<ExeHost>
<Program>EnableClientCertAuth.bat</Program>
<Arguments>0.0.0.0:8677</Arguments>
<WorkingFolder>CodePackage</WorkingFolder>
</ExeHost>
</SetupEntryPoint>
<EntryPoint>
<ExeHost>
<Program>MyServices.SF.Api.exe</Program>
</ExeHost>
</EntryPoint>
</CodePackage>
Besides the regular EntryPoint
we now also have a SetupEntryPoint
. It has a batch file as the program and we pass the ipport
as argument. In my case this is 0.0.0.0:8677
.
The batch file EnableClientCertAuth.bat
should be located at the project root. It's very simple as it just calls a PowerShell script to do the real work:
powershell.exe -ExecutionPolicy Bypass `
-Command ".\EnableClientCertAuth.ps1 -IpPort %1"
The PowerShell script should also be located at the project root and both files must be copied to the build directory. In Visual Studio solution explorer:
First I'll show the PowerShell script itself, then an explanation of what happens.
param([String]$IpPort)
$match = (netsh http show sslcert |
Select-String -Pattern $IpPort -Context:0,1 -SimpleMatch)
if ($match -eq $null) {
Write-Warning "IpPort $ipPort not found in output of 'netsh http show sslcert'"
exit
}
else {
$certHash = $match.Context.PostContext.Split(@(": "), 1)[1]
}
Write-Output "Deleting SSL cert $certHash on port $IpPort"
netsh http delete sslcert ipport=$IpPort
Write-Output @"
Adding SSL cert $certHash on port $IpPort with clientcertnegotiation=enable
"@
netsh http add sslcert ipport=$IpPort `
certhash=$certHash `
appid="{11223344-5566-7788-9900-aabbccddeeff}" `
clientcertnegotiation=enable
The script has four steps:
Select-String
to find the output lines that match the specified ipport. We are looking for the certificate hash which always appears one line below the ipport.:
if we actually found a result.We now have a batch file, a PowerShell script and a setup entry point that runs the batch file. The only thing we haven't covered yet is that for binding a certificate to a port you need administrator privileges. So the batch file should run under a privileged account.
This is all very well described in the Service Fabric documentation so I'll just repeat here for the sake of completeness. First you add a principal to your application manifest:
<Principals>
<Users>
<User Name="ApiSetupAdminUser" AccountType="LocalSystem" />
</Users>
</Principals>
And next you specify an additional policy in your ServiceManifestImport
:
<Policies>
<RunAsPolicy CodePackageRef="Code" UserRef="ApiSetupAdminUser"
EntryPointType="Setup" />
</Policies>
If we deploy the updated Service Fabric application to our cluster (or locally), it will run the batch file on every node before our actual service starts. The certificate port binding will be removed and re-added with client certificate negotiation enabled.
To be honest, I'm not perfectly happy with the approach above for two reasons:
netsh http show sslcert
but it doesn't feel like a very stable solution.ServiceManifest.xml
and I can't easily change this between environments.Unfortunately, it's the only way I can think of to make this work. I'd rather have declarative support in the Service Fabric endpoint configuration instead. Something like this:
<Endpoint Protocol="https" Name="WebEndpointHttps" Type="Input"
Port="8677" EnableClientCertificateNegotiation="True" />
There is actually a UserVoice request for supporting client certificate authentication so if you think this is important, please vote for it.
You may think that we have now protected our API because a client must first present a valid client certificate. This is actually literally true: any client with a valid client certificate can access our API. We have only implemented the authentication part: a client must tell who he is before entering.
You still need to authorize clients somehow; determining what an authenticated client is actually allowed to do. You can, for example, maintain a list of valid client certificates and deny access to any other certificate. Or you map client certificates to users in a database.
]]>First a short summary of the things we need to do:
This step actually has nothing to do with Service Fabric but is required if you want to run your API micro-service on TLS (or you could try getting a certificate for mysfcluster.westeurope.cloudapp.azure.com
but I don't think Microsoft will allow that ;)
So what you want is a CNAME record that maps your custom domain name, for this article I'll use mysfcluster.nl
, to the domain of your cluster, e.g. mysfcluster.westeurope.cloudapp.azure.com
.
Again, this has nothing to do with Service Fabric. You need a server authentication certificate in PFX format that includes the private key and the entire certificate chain. And of course the password that protects the private key.
Azure Key Vault can be used to securely store a number of different things: passwords, PFX files, storage account keys, etc. Things you store there can be referenced from Azure Resource Manager templates to be used in web sites, VMs, etc. Uploading a PFX file to Azure Key Vault isn't as easy as it should be, so lucky for us Chacko Daniel from Microsoft has written a nice PowerShell module that handles this for us.
So what I did was clone the GitHub repository and import the module (from a PowerShell prompt):
PS c:\projects> git clone https://github.com/ChackDan/Service-Fabric.git
PS c:\projects> Import-Module Service-Fabric\Scripts\ServiceFabricRPHelpers\ServiceFabricRPHelpers.psm1
We can now invoke the PowerShell command Invoke-AddCertToKeyVault
, which you'll find below, including the expected output.
PS C:\projects> Invoke-AddCertToKeyVault `
-SubscriptionId "12345678-aabb-ccdd-eeff-987654321012" `
-ResourceGroupName MySFResourceGroup `
-Location westeurope `
-VaultName "MyKeyVault" `
-CertificateName "MyAPICert" `
-Password "eivhqfBw=AGUsLuJ2Z<r" `
-UseExistingCertificate `
-ExistingPfxFilePath "C:\projects\mysfcluster_nl.pfx"
Switching context to SubscriptionId 12345678-aabb-ccdd-eeff-987654321012
Ensuring ResourceGroup MySFResourceGroup in westeurope
Using existing vault MyKeyVault in westeurope
Reading pfx file from C:\projects\mysfcluster_nl.pfx
Writing secret to MyAPICert in vault MyKeyVault
Name : CertificateThumbprint
Value : C83D60162D7BDC62A41516CD5007E4FDDD196201
Name : SourceVault
Value : /subscriptions/12345678-aabb-ccdd-eeff-987654321012/resourceGroups/MySFResourceGroup/providers/Microsoft.KeyVault/vaults/MyKeyVault
Name : CertificateURL
Value : https://mykeyvault.vault.azure.net:443/secrets/MyAPICert/e72e1834a1ae4be19f249121cc8fc722
I'll walk you through the parameters for Invoke-AddCertToKeyVault
in order of appearance:
SubscriptionId | The id of the Azure subscription that contains your key vault. When the key vault does not yet exist, it will be created. |
ResourceGroupName | Name of the resource group for your key vault. |
Location | Key vault location. If you run the PowerShell cmd Get-AzureRmLocation you'll get a list of location system names. |
VaultName | The name of your key vault. When the script can not find this key vault, it will be created. |
CertificateName | The name of the PFX resource that is created in the key vault. |
Password | The password that you used to protect the private key in the PFX file. |
UseExistingCertificate | Indicates that we are using an existing certificate. Invoke-AddCertToKeyVault can also be used to generate a self-signed certificate and upload that to the key vault. |
ExistingPfxFilePath | The absolute path to your PFX file. |
An Azure Service Fabric cluster is powered by one or more Virtual Machine Scale Sets. A VM Scale Set is a collection of identical VMs that (in the case of Service Fabric) run the micro-services in your Service Fabric applications.
There is very little support for VM Scale Sets in the portal so we use Azure Resource Explorer for this. If you've opened Azure Resource Explorer, you have to browse to the correct resource, which is the VM Scale Set that powers your SF cluster. In my case, it is called Backend.
Once there, you can add a reference to the certificate in the key vault. In the screenshot below, you see a reference to the key vault itself and multiple certificate references.
If I follow my own example:
/subscriptions/12345678-aabb-ccdd-eeff-987654321012/resourceGroups/MySFResourceGroup/providers/Microsoft.KeyVault/vaults/MyKeyVault
https://mykeyvault.vault.azure.net:443/secrets/MyAPICert/e72e1834a1ae4be19f249121cc8fc722
You can copy these values from the output of the Invoke-AddCertToKeyVault
command. If you save (PUT) the updated VM Scale Set resource description, the certificate will be installed to all VMs in the scale set.
We actually already did this in the previous post so I'll summarize here:
ServiceManifest.xml
with an additional named (https) endpoint.ApplicationManifest.xml
in two places:EndpointBindingPolicy
to the ServiceManifestImport
. This links the https endpoint to a certificate.EndpointCertificate
to the certificates collection. This is a named reference to the thumbprint of the certificate you uploaded to Azure Key Vault earlier.OwinCommunicationListener
. This class is hard-coded to support only http
. You can change this to make it support https
as well.ServiceInstanceListener
that references the https endpoint.For more information about service manifests, application manifest and how they are related, check this post.
There are again quite some steps involved, just as in the previous post on how to get this working locally. Each step by itself isn't complicated but the entire process takes some time and effort.
I hope this helps in setting up a protected endpoint in Service Fabric :)
]]>It is relatively new and documentation is still a bit behind so I had some trouble in getting the following setup working:
mycluster.westeurope.cloudapp.azure.com
I want my-api.my-services.nl
.https
and not the default http
.The documentation, as far as it's available, is rather fragmented and I couldn't find the complete story so I thought I'd write it down for future reference. In my humble opinion, step 1 should always be to get it working on a local dev box so that's what I started out with. Reproducing and fixing an error on your dev-box is a lot easier than fixing the same error in a remote cluster. Besides, it helps in better understanding what is happening.
Here's a short summary of what needs to be done, all the details follow below:
EndpointBindingPolicy
and EndpointCertificate
.OwinCommunicationListener
to take the https protocol into account.If this all sounds like abracadabra, continue reading :)
This step isn't absolutely necessary but it makes the entire setup much nicer. We store this certificate with the other trusted root certificates so that certificates that are signed by it are automatically trusted. This prevents browser certificate warnings later. I used the same trick in an earlier post so I'm not going to repeat all the details.
The self-signed root certificate is generated using makecert
:
makecert -r -pe -n "CN=SSLTestRoot"
-b 06/07/2016 -e 06/07/2018
-ss root -sr localmachine -len 4096
Next step is to use our root certificate to sign our server authentication certificate. Again we use makecert
. This time the certificate is placed in the My
store.
makecert -pe -n "CN=sfendpoint.local" -b 06/07/2016 -e 06/07/2018
-eku 1.3.6.1.5.5.7.3.1 -is root -ir localmachine -in SSLTestRoot
-len 4096 -ss My -sr localmachine
hosts
fileThe hosts
file in C:\Windows\System32\drivers\etc
is the first place Windows looks when it needs to resolve a host name like www.google.com
. In our case, we want to add an entry that matches the common name in our server authentication certificate and sends the user to 127.0.0.1
.
127.0.0.1 sfendpoint.local
We finished all the necessary preparations on our development machine, next step is Service Fabric configuration. In the service manifest file of the (API) service we wish to expose on https, we need to add an additional endpoint, besides the (http) endpoint that is already there.
<ServiceManifest Name="My.SF.ApiPkg" Version="1.0.0" ...>
<ServiceTypes>
<StatelessServiceType ServiceTypeName="ApiType" />
</ServiceTypes>
<CodePackage Name="Code" Version="1.0.0">
<EntryPoint>
<ExeHost>
<Program>My.SF.Api.exe</Program>
</ExeHost>
</EntryPoint>
</CodePackage>
<ConfigPackage Name="Config" Version="1.0.0" />
<Resources>
<Endpoints>
<Endpoint Protocol="http" Name="WebEndpoint" Type="Input" Port="8676" />
<Endpoint Protocol="https" Name="WebEndpointHttps" Type="Input" Port="8677" />
</Endpoints>
</Resources>
</ServiceManifest>
I use port numbers 8676 and 8677 for http and https respectively but that is up to you.
Important note: if you have multiple endpoints, make sure to give each one a unique name. Service Fabric won't complain but your service will not start. This took me some time to figure out because the error messages do not really point you in the right direction.
Next step is the application manifest file. We need two things here: a reference to the certificate and a link between our micro service, the certificate and the endpoint. Note that we configure the certificate hash value (thumbprint) outside the application manifest file in a separate environment configuration file.
<ApplicationManifest ApplicationTypeName="MySFType"
ApplicationTypeVersion="1.0.0" ...>
<Parameters>
<Parameter Name="Api_SslCertHash" DefaultValue="" />
</Parameters>
<ServiceManifestImport>
<ServiceManifestRef ServiceManifestName="My.SF.ApiPkg"
ServiceManifestVersion="1.0.0" />
<ConfigOverrides />
<Policies>
<EndpointBindingPolicy EndpointRef="WebEndpointHttps"
CertificateRef="my_api_cert" />
</Policies>
</ServiceManifestImport>
<DefaultServices>
<Service Name="Api">
<StatelessService ServiceTypeName="ApiType" InstanceCount="-1">
<SingletonPartition />
</StatelessService>
</Service>
</DefaultServices>
<Certificates>
<EndpointCertificate X509FindValue="[Api_SslCertHash]" Name="my_api_cert" />
</Certificates>
</ApplicationManifest>
We added an EndpointBindingPolicy
that references the https endpoint and the certificate my_api_cert
. This tells Service Fabric that for this specific service it should add a certificate to the specified endpoint.
The certificate itself has a name and a thumbprint value that is a reference to a value in an environment-specific configuration file.
OwinCommunicationListener
That was all the necessary Service Fabric configuration. What remains is some code changes. When you add a new stateless api service to your Service Fabric project in Visual Studio, an OwinCommunicationListener
class is added. This class is responsible for booting a self-hosted Owin web server on the correct port number.
By default, this class assumes you never want to use https
. So what you need to do is replace this line of code (that has a hard-code http
reference):
_listeningAddress = string.Format(
CultureInfo.InvariantCulture,
"http://+:{0}/{1}",
port,
string.IsNullOrWhiteSpace(_appRoot)
? string.Empty
: _appRoot.TrimEnd('/') + '/');
with this line of code:
_listeningAddress = string.Format(
CultureInfo.InvariantCulture,
"{0}://+:{1}/{2}",
serviceEndpoint.Protocol,
port,
string.IsNullOrWhiteSpace(_appRoot)
? string.Empty
: _appRoot.TrimEnd('/') + '/');
in the OpenAsync
method. The serviceEndpoint
variable should already be declared somewhere in the first few lines of OpenAsync
.
ServiceInstanceListener
Last but not least we must tell our service that it should (also) listen on the https endpoint. This happens in the StatelessService.CreateServiceInstanceListeners
method that you override in your service class, which in my case looks like this:
internal sealed class Api : StatelessService
{
public Api(StatelessServiceContext context) : base(context) { }
protected override IEnumerable<ServiceInstanceListener>
CreateServiceInstanceListeners()
{
return new[]
{
new ServiceInstanceListener(
serviceContext => new OwinCommunicationListener(
Startup.ConfigureApp, serviceContext, ServiceEventSource.Current,
"WebEndpoint"), "Http"),
new ServiceInstanceListener(
serviceContext => new OwinCommunicationListener(
Startup.ConfigureApp, serviceContext, ServiceEventSource.Current,
"WebEndpointHttps"), "Https")
};
}
}
Note that each listener references the name of the endpoint it should listen on.
That is 'all' there is to it. Well, it's actually quite a lot but the individual steps aren't too complicated. Using the instructions above it should now be rather easy to get this working on your machine too.
Next time: how to set this up for an actual Service Fabric cluster running in Azure.
]]>readme.md
that tell you whether the current build passed. Until a few days ago I didn't know how these were implemented but since I have my own small open-source GitHub project now, I wanted a badge. Sounds a bit like gamification if I say it like this but that's an entirely different topic :)The badge I'm aiming for is this one:
It's from AppVeyor, a continuous delivery service for Windows. Out-of-the-box it supports msbuild. Since my project is ASP.NET Core (RC1) with an xUnit.net test suite, some configuration must be added to the project.
Adding your GitHub project itself to AppVeyor is really easy: just login to https://ci.appveyor.com/login with your GitHub account credentials and the rest should point itself.
Next step is to add an appveyor.yml
to the root folder of your project. You can check out my most recent version here. I'll list it here to be able to explain the parts.
version: 1.0.{build}
# For now just the develop branch.
branches:
only:
-develop
# Defines the machine that is used to run build/test/deploy/...
os: Visual Studio 2015
# Called after cloning the repository.
install:
# Add the v3 NuGet feed and myget.org (for moq.netcore package).
- nuget sources add -Name api.nuget.org -Source https://api.nuget.org/v3/index.json
- nuget sources add -Name myget.org -Source https://www.myget.org/F/aspnet-contrib/api/v3/index.json
# Install dnvm.
- ps: "&{$Branch='dev';iex ((new-object net.webclient).DownloadString('https://raw.githubusercontent.com/aspnet/Home/dev/dnvminstall.ps1'))}"
# Install coreclr (no need for startup improvement here)
- dnvm upgrade -r coreclr -NoNative
# Called before building.
before_build:
- dnu restore
- cd %APPVEYOR_BUILD_FOLDER%\src\Localization.JsonLocalizer
# Replace default build.
build: off
build_script:
- dnu build
# Called before running tests.
before_test:
- cd %APPVEYOR_BUILD_FOLDER%\test\Localization.JsonLocalizer.Tests
# Replace default test.
test: off
test_script:
- dnx test
My configuration has three stages:
dnu build
.dnx test
Some details worth noting:
Visual Studio 2015
build machine is configured with the v2 NuGet feed. I add the v3 feed and the myget.org
feed because that's where the moq.netcore
package lives that I use in my xUnit tests.-NoNative
flag for dnvm upgrade
. This skips native image generation to improve startup time. The only thing that needs starting up are unit tests and these run just once. Native image compilation costs way more time than I can win back in unit test startup time improvements.APPVEYOR_BUILD_FOLDER
that points to the folder that the project was cloned into.On the AppVeyor overview page, the result of a successful build is this:
This result includes both the build and the tests. You already saw the badge that I included in my readme.md
file. The badge itself is an SVG image that is generated to describe your latest build result.
So that's it, pretty easy once you understand how it works. I didn't invent all of this myself of course; there's a nice post by Nimesh Manmohanlal that handles the installation steps. I added the necessary build and test steps.
]]>Free DV certificates seem to be the new trend nowadays with Symantec being the next player in the market announcing they're giving them away for free. Let's Encrypt issued their first certificate on September 14, 2015 and announced on March 8, 2016 that they were at one million after just three months in public beta.
I happen to be developing an ASP.NET Core website for a customer of ours that required a certificate so Let's Encrypt seemed to make sense1. The easiest way to automatically connect a Let's Encrypt certificate to an Azure web site is via the excellent Let's Encrypt site extension by Simon J.K. Pedersen. Please note that there's both a x86 and x64 version.
There's some excellent guidance on installing and configuring the extension elsewhere on the web so I won't go into details on that. What I'd like to discuss is how to configure your ASP.NET Core web application in such a way that Let's Encrypt actually returns a certificate when asked to do so.
You may wonder: how does Let's Encrypt validate a certificate request? It issues domain-validated certificates so how does it validate that you are the owner of the domain? Enter ACME: the Automatic Certificate Management Environment. ACME is an IETF internet draft (and still a work-in-progress, for the latest version, check out their GitHub repo).
The entire purpose of the ACME specification is to provide a contract between a certificate authority and an entity requesting a certificate (the applicant) so that the certificate request process can be entirely automated.
If an applicant requests a certificate, he has to provide the URL to which the certificate should be applied, e.g. example.com
. Let's Encrypt now expects a number of files to present at the following (browsable) url: http://example.com/.well-known/acme-challenge/
. In my website, the contents of this folder are the following:
So that's how Let's Encrypt checks that you own the domain: by checking the presence of a specific set of files in a specific location on the domain you claim to be the owner of. In official terms this is called challenge-response authentication. Please read the ACME specification if you want to know what these files actually mean.
The Let's Encrypt site extension makes sure there is a .well-known/acme-challenge
folder in the wwwroot
folder of your site and that it has the correct contents2. Here's the same folder as seen from the KUDU console:
So all is well and we call upon our site extension to request and install the certificate. And, well, nothing happens, no errors but also no certificate. The output from the Azure WebJob functions that execute the request provides no details at all (not even in the logging):
What goes wrong is actually two things:
.well-known/acme-challenge
folder must be browsableSo how do we fix this? As with most ASP.NET Core configuration: through middleware. First some code, then the explanation:
public class Startup
{
...
public void Configure(IApplicationBuilder app, IHostingEnvironment env)
{
var rootPath = Path.GetFullPath(".");
var acmeChallengePath =
Path.Combine(rootPath, @".well-known\acme-challenge");
app.UseDirectoryBrowser(new DirectoryBrowserOptions
{
FileProvider = new PhysicalFileProvider(acmeChallengePath),
RequestPath = new PathString("/.well-known/acme-challenge"),
});
app.UseStaticFiles(new StaticFileOptions
{
ServeUnknownFileTypes = true
});
}
}
Most of the code should be clear but some points of interest:
D:\home\site\wwwroot
) and append .well-known\acme-challenge
to it.acme-challenge
folder is browsable, not every folder in your website.acme-challenge
folder are all extensionless so without a known file type.So, with this middleware configuration in place we can again request a certificate and this time it will work. At least it did for me ;-)
I hope this post has given you some background information on cool new technology like Let's Encrypt and ACME and will help you in setting up Let's Encrypt for your ASP.NET Core websites.
System.Collections.Concurrent
namespace. It provides several thread-safe collection classes, one of which is ConcurrentDictionary<TKey, TValue>
. The standard Dictionary
class is not thread-safe and when a reader detects a simultaneous write it throws an InvalidOperation
: Collection was modified; enumeration operation may not execute
. A ConcurrentDictionary
can be read from and written to simultaneously from multiple threads.This post specifically concerns two methods of the ConcurrentDictionary
class: AddOrUpdate
and GetOrAdd
. Both accept a delegate for generating the value to be updated or added. So what happens when multiple threads call GetOrAdd
with the same key? This may occur when you use the dictionary as a simple cache, for example: two threads need the same cached value or add it when it isn't available.
In case two threads call GetOrAdd
with the same key and the value factory is a delegate, the delegate is actually run on both threads. This is documented in the remarks section but it may not always be what you want. The operation to get the value could be CPU or I/O intensive so ideally you want to run it just once for a particular dictionary key. In a project I'm currently working on, obtaining the value involves traversing a directory structure looking for a certain file. Something I'd like to do just once.
So this is where the 'lazy' part of this post comes into play. Suppose we have a ConcurrentDictionary<string, string>
where the value takes some time to compute. For example:
var dictionary = new ConcurrentDictionary<string, string>();
var value = dictionary.GetOrAdd("key", _ =>
{
// Perform a CPU or I/O intensive operation to obtain the value.
return "value";
});
How to prevent the operation from running twice? The framework offers the Lazy<T>
class for that. It can be used for lazy initialization of values but it also offers handy support for our case. First we change the dictionary to have lazy values:
var dictionary = new ConcurrentDictionary<string, Lazy<string>>();
Next, we move the value generator delegate to the lazy instance and specify a LazyThreadSafetyMode
of ExecutionAndPublication
. This means only one thread is allowed to initialize the value:
var lazy = new Lazy<string>(() =>
{
// Perform a CPU or I/O intensive operation to obtain the value.
return "value";
}, LazyThreadSafetyMode.ExecutionAndPublication);
var lazyValue = dictionary.GetOrAdd("key", lazy);
var value = lazyValue.Value;
What happens here is two things:
Lazy<string>
instance to the concurrent dictionary in a thread-safe manner.Lazy<T>.Value
actually executes the value generator, other threads simply wait for the value to become available.I wrote this post mainly because I wasn't aware that the ConcurrentDictionary
methods that accept a delegate are thread-safe but still allow their delegates to run simultaneously. Maybe you didn't know this either and this post provides you a simple way of preventing this.
So ideally I would tap into the same Owin middleware pipeline that regular ASP.NET requests pass through. Unfortunately, that's impossible: SignalR uses different abstractions for similar concepts like 'request' and 'caller context'. So there's some plumbing involved, especially where token validation is involved. I copied some classes from the Katana Project library for that, especially from the Microsoft.Owin.Security.ActiveDirectory
package.
The SignalR protocol can be roughly divided into two stages: connection setup and realtime communication over this connection (there's of course a lot more detail to it). You'd want to authenticate the client and validate its token on the connect, not on every subsequent call. It doesn't make sense to authenticate each realtime call since these aren't possible anyway without first connecting.
To implement authentication for SignalR hubs, the AuthorizeAttribute
is provided. It implements two interfaces: IAuthorizeHubConnection
and IAuthorizeHubMethodInvocation
, essentially implementing both SignalR protocol stages: connect and communicate.
So what does this look like? And what can we borrow from Katana to simplify and improve things? First the outline of our JwtTokenAuthorizeAttribute
(by the way: I attached a zip file with a VS2015 project containing all code at the end of this post):
[AttributeUsage(AttributeTargets.Class, Inherited = false, AllowMultiple = false)]
public sealed class JwtTokenAuthorizeAttribute : AuthorizeAttribute
{
public override bool AuthorizeHubConnection(
HubDescriptor hubDescriptor, IRequest request)
{
// Authorize a connection attempt from the client. We expect a token on
// the request.
...
}
public override bool AuthorizeHubMethodInvocation(
IHubIncomingInvokerContext hubIncomingInvokerContext, bool appliesToMethod)
{
// Make sure the context for each method call contains our authenticated principal.
// No additional authentication is performed here.
...
}
}
And this is how we apply it:
[JwtTokenAuthorize]
public class NewEventHub : Microsoft.AspNet.SignalR.Hub
{
....
}
All that leaves us is implementing the attribute class. First step is getting the token from the IRequest
, which is simple:
public override bool AuthorizeHubConnection(
HubDescriptor hubDescriptor, IRequest request)
{
// Extract JWT token from query string.
var userJwtToken = request.QueryString.Get("token");
if (string.IsNullOrEmpty(userJwtToken))
{
return false;
}
...
You can see in the first part of this two-part series that I named the query string parameter token
but you can give it any name you like of course. If there is no token on the query string, we return false
to indicate authentication did not succeed.
The next step is where the magic happens: validating the token and extracting a ClaimsPrincipal
from the set of claims in the JWT (JSON Web Token). Validating the token means checking the token cryptographic signature. The question then becomes: what do we check against? Each issued JWT is signed by the private key part of a public/private key pair maintained by Azure AD (assuming of course we actually obtained a token from Azure AD). An application can use the corresponding public key to check the token signature. The public key is found in the tenants federation metadata document. This document is found on the following URL: https://login.windows.net/yourtenant.onmicrosoft.com/federationmetadata/2007-06/federationmetadata.xml
.
Lucky for us, a lot of code for handling the federation metadata document and validating the token is already available in the Katana project.
public class JwtTokenAuthorizeAttribute : AuthorizeAttribute
{
// Location of the federation metadata document for our tenant.
private const string SecurityTokenServiceAddressFormat =
"https://login.windows.net/{0}/federationmetadata/2007-06/federationmetadata.xml";
private static readonly string Tenant = "yourtenant.onmicrosoft.com";
private static readonly string ClientId = "12345678-ABCD-EFAB-1234-ABCDEF123456";
private static readonly string MetadataEndpoint = string.Format(
CultureInfo.InvariantCulture, SecurityTokenServiceAddressFormat, Tenant);
private static readonly IIssuerSecurityTokenProvider CachingSecurityTokenProvider =
new WsFedCachingSecurityTokenProvider(
metadataEndpoint: MetadataEndpoint,
backchannelCertificateValidator: null,
backchannelTimeout: TimeSpan.FromMinutes(1),
backchannelHttpHandler: null);
public override bool AuthorizeHubConnection(
HubDescriptor hubDescriptor, IRequest request)
{
// Extract JWT token from query string (which we already did).
...
// Validate JWT token.
var tokenValidationParameters =
new TokenValidationParameters { ValidAudience = ClientId };
var jwtFormat =
new JwtFormat(tokenValidationParameters, CachingSecurityTokenProvider);
var authenticationTicket = jwtFormat.Unprotect(userJwtToken);
...
We start with the JwtFormat
class. This class is used to extract and validate the JWT. It's in fact a wrapper around the JwtSecurityTokenHandler
class with the added bonus of 'automatic' retrieval of SecurityToken
s from the tenants federation metadata document (in this case a X509SecurityToken
).
The tenants security tokens are retrieved through the IIssuerSecurityTokenProvider
interface. Unfortunately, this is where code reuse ends and copying begins. There exists an implementation of IIssuerSecurityTokenProvider
that is also used in the pipeline you set up when using UseWindowsAzureActiveDirectoryBearerAuthentication
: WsFedCachingSecurityTokenProvider
. This class handles communication with the federation metadata endpoint, extracts the security tokens necessary to validate the JWT signature and maintains a simple cache of this information; just what we need. However, this class is internal. And it uses a number of other internal classes.
So what I did for my project was copy all the necessary classes from the Microsoft.Owin.Security.ActiveDirectory
Katana project. In the code above, you see the WsFedCachingSecurityTokenProvider
configured with just the URL for the metadata document (and a timeout that governs communication with the metadata endpoint). Simple as that. The call to JwtFormat.Unprotect
takes care of the rest.
The next steps are some obligatory checks against the AuthenticationTicket
:
public override bool AuthorizeHubConnection(
HubDescriptor hubDescriptor, IRequest request)
{
// Extract and validate token.
...
// Check ticket properties.
if (authenticationTicket == null)
{
return false;
}
var currentUtc = DateTimeOffset.UtcNow;
if (authenticationTicket.Properties.ExpiresUtc.HasValue &&
authenticationTicket.Properties.ExpiresUtc.Value < currentUtc)
{
return false;
}
if (!authenticationTicket.Identity.IsAuthenticated)
{
return false;
}
...
The ticket shouldn't be null
, it should not be expired and the identity should be authenticated. The final step is to somehow store the authenticated identity so that we can use it in our SignalR hub method calls. Remember, we are still just connecting with the hub and not calling any methods on it.
public override bool AuthorizeHubConnection(
HubDescriptor hubDescriptor, IRequest request)
{
// Extract and validate token, check basic authentication ticket properties.
...
// Create a principal from the authenticated identity.
var claimsPrincipal = new ClaimsPrincipal(authenticationTicket.Identity);
// Remember new principal in environment for later use in method invocations.
request.Environment["server.User"] = newClaimsPrincipal;
// Return true to indicate authentication succeeded.
return true;
}
We create a ClaimsPrincipal
from the identity and store it in the environment under the key server.User
. You may wonder where this key comes from. The core Owin spec defines a number of required environment keys and the Katana project extends this set. One of the extension keys is server.User
which should be of type IPrincipal
.
Remember that the SignalR AuthorizeAttribute
implemented two interfaces. We have implemented IAuthorizeHubConnection
so what's left is IAuthorizeHubMethodInvocation
. This code is a lot shorter:
public override bool AuthorizeHubMethodInvocation(
IHubIncomingInvokerContext hubIncomingInvokerContext, bool appliesToMethod)
{
HubCallerContext hubCallerContext = hubIncomingInvokerContext.Hub.Context;
var environment = hubCallerContext.Request.Environment;
object claimsPrincipalObject;
ClaimsPrincipal claimsPrincipal;
if (environment.TryGetValue("server.User", out claimsPrincipalObject) &&
(claimsPrincipal = claimsPrincipalObject as ClaimsPrincipal) != null &&
claimsPrincipal.Identities.Any(id => id.IsAuthenticated))
{
var connectionId = hubCallerContext.ConnectionId;
hubIncomingInvokerContext.Hub.Context =
new HubCallerContext(new ServerRequest(environment), connectionId);
return true;
}
return false;
}
Here we pick the ClaimsPrincipal
from the environment where it was stored in the connection process. If we find it, we create a new HubCallerContext
using the environment containing the principal.
Well, we're finally where we want to be: actually call a SignalR hub method with a principal that originates from the JWT we sent from the client. A sample hub method may look like this:
[JwtTokenAuthorize]
public class NewEventHub : Microsoft.AspNet.SignalR.Hub
{
public async Task CopyEvent(int eventId)
{
// Get current principal.
var currentPrincipal = ClaimsPrincipal.Current;
var currentIdentity = currentPrincipal.Identity;
// Do stuff that requires authentication.
return "Copy event successful";
}
}
Note that we did not have to get the principal from some environment using the server.User
key. This is because SignalR internally uses the same Owin classes as the Katana project so a principal stored in the environment as server.User
is automatically translated into a principal on the current call context.
Some credits should go to Shaun Xu for this blog post. It shows where in the environment to store the authenticated principal and how to set the context so method calls have access to this principal.
]]>Suppose you have a HTML/JS front-end and a back-end that exposes a SignalR hub. The official documentation suggests that you should integrate SignalR into the existing authentication structure of the application. So you authenticate to your application, inform the client of the relevant authentication information (username and roles for example) and use this information in calls back to the SignalR hub. This seems a bit backward if you ask me.
I already have ADAL JS on the client (browser). ADAL JS provides the client with a JWT token that is stored in local or session storage. So the first question is: how do we configure SignalR on the client to send the token along with requests to the SignalR hub on the server. That's the topic of the current post. In the next post, the server-side of things will be handled.
On the client I use AngularJS and jQuery so I also use the ADAL JS Angular wrapper. This makes initialization easier and allows you to configure ADAL JS on routes to trigger authentication. So the code samples assume that you use AngularJS and ADAL AngularJS. The client-side SignalR library allows for easy extension of the SignalR connect requests from the client to the server, as shown in the following example:
// Id of the client application that must be registered in Azure AD.
var clientId = "12345678-abcd-dcba-0987-fedcba12345678";
var NotificationService = (function () {
// Inject adalAuthenticationService into AngularJS service.
function NotificationService(adalAuthenticationService) {
this.adalAuthenticationService = adalAuthenticationService;
}
NotificationService.prototype.init = function () {
var self = this;
$.connection.logging = true;
$.connection.hub.logging = true;
$.connection.hub.transportConnectTimeout = 10000;
// Add JWT token to SignalR requests.
$.connection.hub.qs = {
token: function () {
// Obtain token from ADAL JS cache.
var jwtToken = self.adalAuthenticationService.getCachedToken(clientId);
return (typeof jwtToken === "undefined" || jwtToken === null)
? ""
: jwtToken;
}
};
$.connection.hub.start();
};
NotificationService.$inject = ["adalAuthenticationService"];
return NotificationService;
})();
appMod.service("notificationService", NotificationService);
appMod.run(NotificationService);
The magic happens on the $.connection.hub.qs
property. Parameters specified there are sent on subsequent SignalR negotiate, connect and start requests1. So we'd expect a token
parameter in our case. When recording network traffic between client and server we can see this is actually happening:
And here are the details of the connect request. You can see that subsequent ping requests also contain the ADAL JS JWT token:
So that's it for the client side of things. In the next post we switch to the server and see how to intercept the token and use it to create a principal that can be used for authorization.
One interesting 'limitation' of implicit grants is that the access token you receive once you're authenticated, is returned in a URL fragment. This limits the amount of information that can be stored inside the token since URL's have a limited length (this varies per browser and server). This means that the token does not contain any role information, otherwise the URL might become too long. So even when you're a member of one or more groups in Azure AD, this information will not be exposed through the access token.
So, what to do when you actually wanted to use role-based authorization in your backend API? Luckily, there is the Azure AD Graph API for that1. It allows you to access the users and groups from your Azure AD tenant. The flow is then as follows:
UseWindowsAzureActiveDirectoryBearerAuthentication
from the Microsoft.Owin.Security.ActiveDirectory
NuGet package to add the necessary authentication middleware to the Owin pipeline. I left out some of the necessary error handling and logging.// Apply bearer token authentication middleware to Owin IAppBuilder interface.
private void ConfigureAuth(IAppBuilder app)
{
// ADAL authentication context for our Azure AD tenant.
var authContext = new AuthenticationContext(
$"https://login.windows.net/{tenant}", validateAuthority: true,
TokenCache.DefaultShared);
// Secret key, generated in the Azure portal to enable authentication of
// an application (in this case our Web API) against an Azure AD tenant.
var applicationKey = ...;
// Root URL for Azure AD Graph API.
var azureGraphApiUrl = "https://graph.windows.net";
var graphApiServiceRootUrl = new Uri(new Uri(azureGraphApiUrl), tenantId);
// Add bearer token authentication middleware.
app.UseWindowsAzureActiveDirectoryBearerAuthentication(
new WindowsAzureActiveDirectoryBearerAuthenticationOptions
{
// The id of the client application that must be registered in Azure AD.
TokenValidationParameters =
new TokenValidationParameters { ValidAudience = clientId },
// Our Azure AD tenant (e.g.: contoso.onmicrosoft.com).
Tenant = tenant,
Provider = new OAuthBearerAuthenticationProvider
{
// This is where the magic happens. In this handler we can perform
// additional validations against the authenticated principal or
// modify the principal.
OnValidateIdentity = async ctx =>
{
try
{
// Retrieve user JWT token from request.
var authorizationHeader =
ctx.Request.Headers["Authorization"].First();
var userJwtToken =
authorizationHeader.Substring("Bearer ".Length).Trim();
// Get current user identity from authentication ticket.
var authenticationTicket = ctx.Ticket;
var identity = authenticationTicket.Identity;
// Credential representing the current user. We need this to
// request a token that allows our application access to the
// Azure Graph API.
var userUpnClaim = identity.FindFirst(ClaimTypes.Upn);
var userName = userUpnClaim == null
? identity.FindFirst(ClaimTypes.Email).Value
: userUpnClaim.Value;
var userAssertion = new UserAssertion(userJwtToken,
"urn:ietf:params:oauth:grant-type:jwt-bearer", userName);
// Credential representing our client application in Azure AD.
var clientCredential = new ClientCredential(clientId, applicationKey);
// Get a token on behalf of the current user that lets Azure AD
// Graph API access our Azure AD tenant.
var authResult = await authContext.AcquireTokenAsync(
azureGraphApiUrl, clientCredential, userAssertion).ConfigureAwait(false);
// Create Graph API client and give it the acquired token.
var adClient = new ActiveDirectoryClient(graphApiServiceRootUrl,
() => Task.FromResult(authResult.AccessToken));
// Get current user groups.
var pagedUserGroups = await
adClient.Me.MemberOf.ExecuteAsync().ConfigureAwait(false);
do
{
// Collect groups and add them as role claims to our principal.
var directoryObjects = pagedUserGroups.CurrentPage.ToList();
foreach (var directoryObject in directoryObjects)
{
var group = directoryObject as Group;
if (group != null)
{
// Add ObjectId of group to current identity as role claim.
identity.AddClaim(
new Claim(identity.RoleClaimType, group.ObjectId));
}
}
pagedUserGroups = await
pagedUserGroups.GetNextPageAsync().ConfigureAwait(false);
} while (pagedUserGroups != null);
}
catch (Exception e)
{
throw;
}
}
}
});
}
Quite a lot of code (and comments) but the flow should be rather easy to follow:
UserAssertion
that represents the current user.AuthenticationContext
for a token that gives our application access to the Azure Graph API on behalf of the current user.ActiveDirectoryClient
class from the Graph API library to obtain information on the current user. You might wonder how this client knows who the 'current user' is. This is determined by the token we provided: remember we asked for a token on-behalf-of the current user. An additional advantage is that we only need minimal access rights for our application: a user should be able to read his own groups.The Graph API is an external application that we want to use from our own application. We need to configure the permissions our application requires from the Graph API to be able to retrieve the necessary information. Only two delegated permissions are needed:
UserAssertion
class also has a constructor that accepts just a token and no other information that could uniquely identify a user. Using this constructor causes a serious security issue with the TokenCache.DefaultShared
that we use. Tokens that should be different because we obtained them via a different user assertion, are regarded as equal by the cache. This may cause a cached token from one user to be used for another user.