I've been involved in a project that uses Pivotal CloudFoundry as the PAAS platform of choice. To provide some minimal background info: CloudFoundry is an open-source PAAS platform that can run on top of a number of cloud infrastructures: Azure, AWS, GCP, OpenStack, VMware vSphere and more. Pivotal is a company that offers a commercial CloudFoundry package that includes support, certification and additional services.
I was asked to develop a smoke test to ensure a certain level of confidence in the Single-Sign-On (SSO) capabilities of the platform. SSO in CloudFoundry is taken care of by CloudFoundry User Account and Authentication (UAA) Server, an open-source, multi-tenant, OAuth2 identity management service. Not knowing a lot about UAA and knowing that it is open-source, I decided that my first step should be to try and install UAA on my laptop and get it up-and-running, ideally inside a debugger so that I could step through authorization and token requests. This blog post explains how to do that, how to configure a local UAA database and how to interact with UAA once installed.
Some additional details before getting started:
- I'm running a Windows 10 laptop...
- ...with the Windows Subsystem for Linux running Ubuntu
- UAA will be installed on this Ubuntu distribution
- Debugging via IntelliJ on Windows. JetBrains has a free community edition of IntelliJ that is ideal for this sort of work.
Installing and configuring UAA
Cloning the UAA repo and performing an initial run
Following the UAA documentation you can see that installing UAA locally is really easy. Just perform the following steps:
$ git clone git://github.com/cloudfoundry/uaa.git
$ cd uaa
$ ./gradlew run
However, that is not exactly what I did... I'd like to use IntelliJ to set breakpoints and step through code and IntelliJ is installed on my Windows box. So what I actually did was clone the UAA repo on my Windows box to the folder %HOMEPATH%\IdeaProjects\uaa (in my case: C:\Users\rwwil\IdeaProjects\uaa). You can now open the project inside IntelliJ and browse through all the code.
Next, inside Ubuntu, you need to locate the folder you cloned UAA into. In my case this is /mnt/c/Users/rwwil/IdeaProjects/uaa. From that folder you can execute ./gradlew run and all should be well: you should now have a local UAA running on the default Tomcat port 8080.
Adding debugger support
Of course it's very nice to have it all up-and-running but in my opinion it helps tremendously to be able to step through code to see what is going on and understand what happens. So we want to attach IntelliJ as debugger to the running UAA instance. First, this requires some configuration inside IntelliJ: you need to create a remote debugging configuration. This option is available from the Run → Edit Configurations... menu. In my case it looks like this:
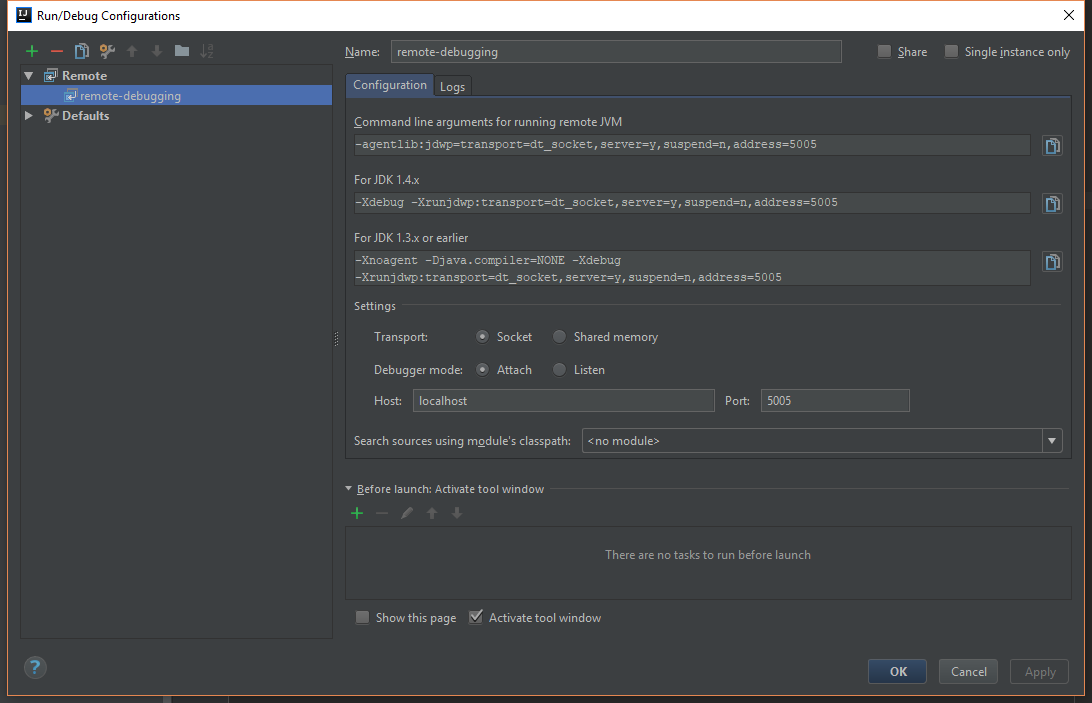
Note the command-line arguments that must be added to the remote JVM:
-agentlib:jdwp=transport=dt_socket,server=y,suspend=n,address=5005
Unfortunately, we started UAA via Gradle and to be honest I have no idea how to add additional command-line options to the Java process that is started by Gradle. So what we need is the complete command line of the running Java process. This is quite easy on Linux:
$ ps -ef | less
We get all running processes (-e) with their full command line (-f). The output should look as follows:
UID        PID  PPID  C STIME TTY          TIME CMD
root         1     0  0 Nov20 ?        00:00:00 /init
rwwilden     2     1  0 Nov20 tty1     00:00:00 -bash
rwwilden    82     1  0 Nov20 tty2     00:00:00 -bash
rwwilden   179     1  0 Nov21 tty3     00:00:04 -bash
rwwilden   299     2  0 Nov24 tty1     00:06:19 /usr/lib/jvm/java-8-openjdk-amd64/jre/bin/java -agentlib:jdwp=transport=dt_socket,server=y,suspend=n,address=5005 -javaagent:/tmp/cargo/jacocoagent.jar=output=file,dumponexit=true,append=false,destfile=/mnt/c/Users/rwwil/IdeaProjects/uaa/build/integrationTestCoverageReport.exec -DLOGIN_CONFIG_URL=file:///mnt/c/Users/rwwil/IdeaProjects/uaa/./uaa/src/main/resources/required_configuration.yml -Xms128m -Xmx512m -Dsmtp.host=localhost -Dsmtp.port=2525 -Dspring.profiles.active=default,sqlserver -Dcatalina.home=/mnt/c/Users/rwwil/IdeaProjects/uaa/build/extract/tomcat-8.5.16/apache-tomcat-8.5.16 -Dcatalina.base=/tmp/cargo/conf -Djava.io.tmpdir=/tmp/cargo/conf/temp -Djava.util.logging.manager=org.apache.juli.ClassLoaderLogManager -Djava.util.logging.config.file=/tmp/cargo/conf/conf/logging.properties -classpath /mnt/c/Users/rwwil/IdeaProjects/uaa/build/extract/tomcat-8.5.16/apache-tomcat-8.5.16/bin/tomcat-juli.jar:/mnt/c/Users/rwwil/IdeaProjects/uaa/build/extract/tomcat-8.5.16/apache-tomcat-8.5.16/bin/bootstrap.jar:/usr/lib/jvm/java-8-openjdk-amd64/lib/tools.jar org.apache.catalina.startup.Bootstrap start
rwwilden   772     1  0 Nov28 tty4     00:00:04 -bash
You get a very long Java command line that you can copy and modify as needed. In our case, we'd like to add debugging options (which I already added in the example output above).
Now paste the modified command line and run it and we have a Java process that IntelliJ can attach to.
Configuring for Microsoft SQL Server
By default, UAA runs with an in-memory database, losing all data between restarts. My laptop runs Microsoft SQL Server which UAA actually supports so let's check out how to configure this.
The way UAA selects between data stores is via Spring Profiles. We can add a profile to the command-line we just copied. Just add sqlserver to the spring.profiles.active command-line parameter: -Dspring.profiles.active=default,sqlserver.
Next step is the connection string for SQL Server. This can be configured in uaa/server/src/main/resources/spring/env.xml. For my local setup I use the following:
<beans profile="sqlserver">
  <description>Profile for SQL Server scripts on an existing database</description>
  <util:properties id="platformProperties">
    <prop key="database.driverClassName">com.microsoft.sqlserver.jdbc.SQLServerDriver</prop>
    <prop key="database.url">jdbc:sqlserver://localhost:1433;database=uaa;</prop>
    <prop key="database.username">root</prop>
    <prop key="database.password">changemeCHANGEME1234!</prop>
  </util:properties>
  <bean id="platform" class="java.lang.String">
    <constructor-arg value="sqlserver" />
  </bean>
  <bean id="validationQuery" class="java.lang.String">
    <constructor-arg value="select 1" />
  </bean>
  <bean id="limitSqlAdapter" class="org.cloudfoundry.identity.uaa.resources.jdbc.SQLServerLimitSqlAdapter"/>
</beans>
So I have a local database named uaa and a user named root. Now we have a setup where we can actually see what UAA is writing to the database when certain actions are performed.
Interacting with UAA
Ok, final step: what can we do with UAA once we have it up-and-running? It is an OAuth2 server so let's see if we can get a token somehow. The easiest way to communicate with UAA is through the UAA CLI (UAAC). This is a Ruby application so you need to install Ruby to get it working (there is some work underway on a Golang version of the CLI).
First we have to point UAAC to the correct UAA instance:
uaac target http://localhost:8080/uaa
Next, we'd like to perform some operations on UAA so for that we need an access token that allows these operations. UAA comes pre-installed with an admin client application that you can get a token for:
uaac token client get admin -s "adminsecret"
If we dissect this line:
uaac token: perform some token operation on UAAclient: use the OAuth2 client credentials grantget: get a tokenadmin -s "adminsecret": get a token for the application withclient_id=adminandclient_secret=adminsecret
The output should be:
Successfully fetched token via client credentials grant.
Target: http://localhost:8080/uaa
Context: admin, from client admin
The obtained token is stored (in my case) in /home/rwwilden/.uaac.yml.
Using this token we can now perform some administration tasks on our local UAA. Some examples:
Add a local user:
uaac user add smokeuser --given_name smokeuser --family_name smokeuser --emails smokeuser2@mail.com --password smokepasswordAdd a local group (or scope in OAuth2 terminology):
uaac group add "smoke.extinguish"Add user to scope:
uaac member add smoke.extinguish smokeuserAdd a client application that requires the
smoke.extinguishscope and allows logging in via the OAuth2 resource owner password credentials grant:uaac client add smoke --name smoke --scope "smoke.extinguish" --authorized_grant_types "password" -s "smokesecret"Obtain a token for user
smokeuseron client applicationsmokeusing the password credentials grant:uaac token owner get smoke smokeuser -s smokesecret -p smokepassword
Of course, there is a lot more to know about CloudFoundry UAA. As I mentioned earlier, it is a full-fledged OAuth2 implementation that has proven itself in numerous (Pivotal) CloudFoundry production installations. Here are some additional references:
- API overview: https://docs.cloudfoundry.org/api/uaa/version/4.7.1/index.html
- SSO in Pivotal CloudFoundry: https://docs.pivotal.io/p-identity/1-2/index.html
- Additional docs on Github: https://github.com/cloudfoundry/uaa/tree/master/docs